Showing posts with label sewing machine. Show all posts

Tuesday, 27 August 2013

stitching with a machine

What's that? Oh yes, I’m procrastinating! I should be moving fabric back into the sewing room but this easier. But as soon as I’m done here, I’ll get to it!

I haven’t done any sewing at home in weeks but I have taken my sewing machine to class on the last two Mondays. That means I am back to working on my “Sampler Blocks”. It takes about three hours in class to complete one of these 12.5” blocks – that is: pressing, cutting, piecing, pressing, piecing, pressing, piecing, pressing. It sounds like a long time but in between there is chatting, consultation with the teacher, chatting, a cup of tea, chatting, goodies to eat, chatting, moving around a cramped classroom, chatting… well, you get the picture.

I’m not sure which, if any, of these blocks I have shown before so here are the five I have completed since (ahem) the beginning of the year. Of course I’ve been working on other things – a fair bit of hand piecing, making my project bag, basting and binding the Earth and Sky Quilt; to name a few. After all, how many of you work on only one project at a time? :-)

So here they are, in the order I made them (I think)

Domino
1 Domino
Oregon Trail
2 Oregon Trail
Cajun Spice
3 Cajun Spice
Pathways
4 Pathways
Blocks and Star
5 Blocks and Star
I think I’d like to see "Pathways" as a whole quilt.

Do you have a favourite?

Wednesday, 5 December 2012

WiPs on Wednesday

Today I am travelling to my mum’s place. She is having the cataract removed from her other eye on Friday and I am going to be with her until Monday. Please pray that it doesn’t rain in or near the township of Moree like it did last year! You may remember that we became trapped by floodwaters for several days in November last year.

~~~~~~
I am slowly working through the long list of WiPs that I published in June and July but the list just seems to get longer as new projects somehow find their way into my craft room! In fact, only two of the seven projects listed here are on that list!

The things that I am concentrating on this month are:
  1. The Very Hungry Caterpillar quilt
  2. Christmas Tree wall-hanging
  3. Cardigan for Me
  4. Deb’s Diamond Blanket
  5. Merlot Toe Up Sock
  6. hexagon project bag
  7. Scrappy Rainbow improv quilt

I don’t know if I’ll get any time to work on that last item. Being away from home for nearly a week plus Christmas activities plus family visiting will cut into my crafting time. Some of these items will not be finished in December: this is just my “focus group”!

Very Hungry Caterpillar Quilt
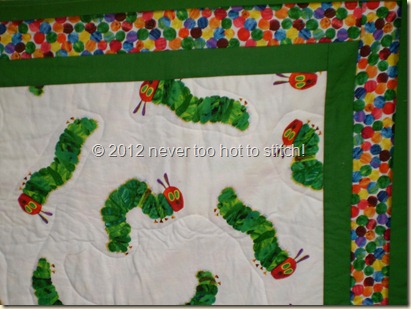
I am making this quilt for my niece who is expecting her first child in March/April. I just have to sew down the binding and add a label and it will be done! I've not labelled my quilts before: tell me please, what does one write on the label when one doesn’t know the name or the sex of the baby, or even which parent’s surname he/she will have? I guess I could just write “Made with love by Great-Aunty Lynne 2012”. Thoughts?
2012 binding on2012 top close up after quilting
There is no stain on the quilt top – that is the light shining through the dotty fabric on the back. You can see the backing here if you haven’t seen it before.

Christmas Tree Wall-Hanging
It would be really good if I could get this finished and hanging before Christmas. You have seen these three embroideries separately but here they are all together. The one on the right is the one I finished today.
2012 three Christmas tree blocks

Cardigan for Me
After much deliberation over patterns, I have chosen to knit the Westall Cardigan (Ravelry link) for me! As I said in this post, I had a bit of trouble getting gauge, which is nothing unusual for me. I finally got within half a stitch using 3.00mm needles instead of the recommended 3.5mm. For those who don’t knit, there are a lot of consequences to not getting the gauge right – the size of garment can be dramatically altered and a loosely knitted garment can stretch beyond redemption after being washed. On the other hand, a garment which is knitted too tightly will strain and pull, and the knitted fabric could pill and wear out much more quickly than would otherwise happen. Worst of all, after hours of knitting and tens of thousands of stitches, it might not fit its intended wearer!

This particular pattern has an unusual construction; it is knitted from the top down, back first then both fronts at once; all three pieces are then joined below the armholes and the rest of the garment is knitted in one piece. It has a gorgeous lace pattern which is relatively simple to knit. This is how much I have knitted since I cast on last Tuesday (27 November). I am up to the armhole shaping of the back and will then go back and pick up the stitches for both fronts from the provisional cast on (that light blue yarn at the bottom of the photo).
2012 Westall cardigan 68 rows in2012 Westall cardigna stitch pattern
 Deb’s Diamond Blanket
After taking twelve months to knit the Intarsia Blanket, I have designed my next blanket project. It is called Deb’s Diamond Blanket and was inspired by this string quilt made by my friend Debbie at Stitchin’ Therapy blog.

My knitted design calls for 112  x 5” (12.5cm) squares which I will join as I go (and sew the ends in – I learnt my lesson from the last blanket). This is how much I have knitted since I started the project on 21 November.  This will be a ten inch square when completed. (3 down, 109 to go!)
2012 Deb's Diamond blanket 3first three squares
 Merlot Toe Up Socks
Neither of my two large knitting projects are ideal for travelling or for knitting in company so I have cast on the second Merlot Sock to take with away with me. I cast on for the first one in September 2011 and would have finished it within a couple of weeks! I wondered why I had put it off for so long but I soon realised while doing Judy’s Magic Cast On on 2.25 (US 1) double-pointed needles -- I don’t like doing this cast on this way. It’s easier on circular needles – but my sock knitting circular needles are otherwise occupied. Obviously I did get it done in the end but it was tricky and annoyingly difficult. Either I’ll use my circulars or stick to cuff down socks for donation knitting in future!
2012 Merlot toe up socks 2nd sock in progress
For those who wonder about such things, I am doing 72 stitches and an hourglass heel (from Lynne Vogel's Twisted Sisters' Sock Workbook)

 Hexagon Project Bag
It seems like a long time since I started my Hexagon Project Bag with so much enthusiasm – a quick check of my blog shows that was only September but it feels much longer ago than that. I still need to cut out six pentagons (I didn’t realise that until yesterday) and six half hexagons and tack them down. Yesterday my sewing teacher showed me hoe to join the hexagons so I’ll see how much weight I have in my bag – if I have enough room I can take them as they’ll make a nice change from knitting. There are 36 hexagons in this photo, believe it or not!
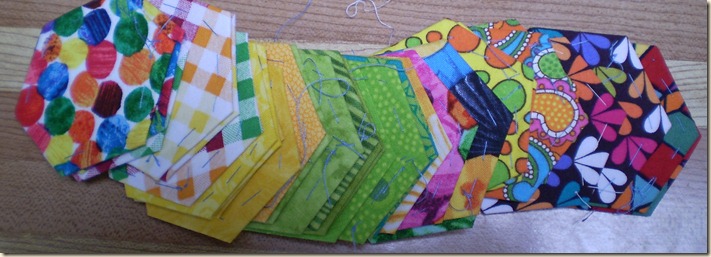
2012 40 hexagons
Do you like my storage container? For what purpose would one use an old 70’s Tupperware container with a cracked lid if not for craft storage? LOL
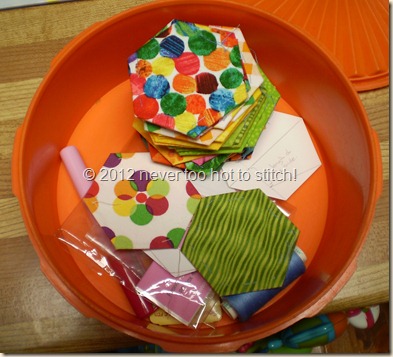
2012 biscuilt hexagon barrel
The bottom two hexagons are the two my teacher joined as a demonstration.

Scrappy Rainbow Improv Quilt
I have more than enough improv blocks to make a quilt top and have bought some fabric to use as sashing – solids in natural and sand; I can't decide which to use yet till I get the blocks up on the design wall. I enjoy the improv block process so I will be making more I’m sure! They also make a good “leader and ender” project (if I ever remember!).

There are 99 x 6.5” blocks in this pile! I'm not sure where the red ones are hiding!
2012 99 improv blocks

What are you working on? Do you still have projects you need to finish before Christmas?

Hopefully linking up with WIP Wednesday over at FreshlyPieced blog


Thursday, 12 January 2012

it appears to be working

Thanks for the advice on dealing with the looping issues on the back of my quilting.

This morning, I brought the machine inside, took it apart, and cleaned it once again.

I wound another bobbin using another spool of thread (which has been using successfully on another machine).

I set the machine for straight stitching - feed dogs up, 1/4 foot on, tension dial set to 4 (where it worked yesterday) - and gave it a test run: perfect stitching top and bottom through two layers of homespun.
I lowered the feed dogs and changed to the quilting foot (which had been lightly oiled as per the instructions in the Brother manual).

But I ran into the a problem - holding both thread above the foot put strain on everything! What was I thinking? This must be the cause of all my looping problems! When my former teacher said bring both threads to the top of the fabric, she obviously meant to hold them under the foot! (not on top of it).

So, I let go of those top threads and put them under the foot, then ran the same two layers of homespun through the machine in a straight line, and lo and behold... tiny, perfect stitches top and bottom.

I changed my two layers of home spun for a quilt sandwich and eased the pressure on the presser foot. I proceeded to try and write my name in cursive. Not bad at all  (my FMQ is improving)
- and still no problems with the machine looping on the back.

So it was time for the big test.

WM took the machine back out to the garage and we loaded it back onto the quilting frame. Making sure that the threads were under the foot plate, I began stitching slowly - such big ugly stitches as you've never seen (unless you've tried FMQ or using a quilting frame or machine)! I sped up the foot pedal and my arms and wow! Things worked - no thread snapping.
Yes, I realise the tension is not quite right but I was more interested in seeing of the machine would work after being re-threaded, re-bobbined, etc!

The real test was what was happening underneath - yep, no loops!

Hurrah!

Perhaps tomorrow DD and I can load our first quilt and get on with it! (We'll practice some stitching first to sort out the tension issues, don't worry).

Stay tuned! And thanks!

Wednesday, 11 January 2012

advice needed from experienced quilters

(and a gasp/giggle for non-quilters when you see the photo at the end!)

On the weekend, DD and I completely cleaned the Brother PQ-1500S that came with my quilting frame (which I bought on Ebay several months ago).

I rethreaded the machine with new, high quality (Gutermann) cotton thread, checked the bobbin and made sure it was inserted correctly.

I sewed a straight seam. The top tension was a bit loose so I tightened it slightly.

I sewed another straight seam through two layers of homepsun - beautiful!

I sewed another straight seam through a quilt sandwich - even more beautiful!

I changed feet. I dropped the feed dogs. I attempted some free motion quilting. The problems with stitch length and wonkiness are due to my inexperience - the machine appeared to be working just fine.

I carried the machine out to the quilting frame in the garage.

I moved the needle just inside the two selvages of my two layers of calico (muslin) on which we have had successful quilting practice before.

I hand-lowered the needle to pull the bobbin thread through to the top.

I sewed three or four stitches in place to anchor the threads and I tried to sew a straight line.

Why then, having worked brilliantly in the kitchen, did I get this on the bottom of the layers before the top thread snapped?

Please, please help me!!

Sunday, 8 January 2012

more fun with sewing machines

Yesterday was very hot and humid. DD brought the Brother 1500S machine in from the garage where it has been in use on the quilting frame. We have had some issues with it - notably the top thread keeps breaking. (Any hints?)

While I quilted the change mat I made the day before, DD cleared the kitchen workbench (well lit by a skylight) and opened up Big Brother. Using a standard machine cleaning brush, she took a fair amount of lint and loose small threads from the area under the feed dogs. Then I gave her a pipe cleaner and a straw (something I'd seen on a blog somewhere some months ago) and she was able to reach further back into the machine.

WM then put machine oil in the six insertion points and I put the machine back together. (Isn't team work great?) I carefully threaded the machine with the manual open beside me and set the tension dial halfway. My first attempt on a piece of scrap fabric showed that the bobbin thread was couched, not sewn as it should be. So I changed the tension and before long I had a perfect row of stitches

I grabbed a sample quiting sandwich that I have used in the past to practice free motion quilting, it sewed beautifully. I then lowered the feed dogs, changed to the darning (quilting) foot and attempted some FMQ. It wasn't great but the machine performed as it should.

We have not yet had a chance to try it out on the quilting frame (it was too hot in the uninsulated garage) but hope that the clean and oil have done the trick.

Back in the sewing room I pieced the last five disappearing nine patch blocks from this top into a panel. I then measured and cut some fabric for the rest of the backing. It would seem that inserted panels are my "look of the moment"! They are certainly a classy way of getting around the fact that quilting fabric is not always wide enough in itself to be used as backing!
held by DD while standing on the lounge


The photo below shows some of the detail of panel.


The fabric used for the backing was a donated fabric - two metres from "The American Woman's Home Collection" (pattern #23998). It was very soft and may be too thin for a backing fabric but it was all I had that was big enough.


So, we have two tops and backings ready to be quilted when the chance arises. It will be exciting to quilt a real project instead of practising on calico!

ETA I am linking up with Fun Thread's Sew What Monday

Sunday, 9 October 2011

What's in a name?

Today I'm linking up with (fellow Aussie) Dawn's blog As Sweet As Cinnamon. Dawn is having a giveaway and asks the question: What's the reason behind your blog name?

I started this blog because a friend had a blog and it sounded like fun. We had met at the Knitters' Guild and we both had "knitting blogs". Sadly my friend no longer posts on her blog -- she has discovered Twitter! Because I like to knit all year round, not just in winter as my mother (who taught me to knit) does, I called my blog "Too Hot to Knit? Never!" The URL was the result of me thinking it was cool to use numerals in my address.

A couple of years ago I joined a site called ravelry.com, and my user-name there is never2hot2knit. For the sake of consistency, I changed my blog name to "Never Too Hot To Knit".

Last year, my DD and I discovered patchwork and quilting but we didn't take it too seriously until this year when we began classes with Elizabeth Wallace of Aussie Patches in May. I was hooked! And my knitting output decreased dramatically!

A couple of months ago, in acknowledgement that this is no longer a "knitting" blog yet reluctant to start another one, I changed the layout of my blog and the title to reflect who I am now: someone who makes stitches with knitting needles or a sewing machine (and occasionally even a crochet hook)!

Now, I'm off to my sewing machine and perhaps tonight, some knitting in front of the television!

Thanks, Dawn, for that bit of fun!

And since I still have a "small blog", I'm also linking up here at Lily's Quilts:
Small Blog Meet

Tuesday, 9 August 2011

"quilting covers a multitude of things"

When I was at the Caring Hearts Community Quilting Group on Thursday, one of the ladies there made the above statement.

I have been working on turning the scrap blocks I was given at CHCQG into a quilt top.

They were all different sizes so I found the smallest of them and cut them all square to the same size (9 1/2 inches). In retrospect, maybe I should have quilted them first but I don't seem to have done too much damage!

I have been quilting in the ditch - I'm getting much better with all the practise; I've even reached medium speed on the machine now!

I don't know who put these blocks together but many of them are not well made. Some of them had more fabric in the strip than had actually been stitched down so rather than quilt in the ditch, I sewed a line of topstitching to hold the loose fabric down.

The way they have been constructed means that often the dark colour seam allowance shows through the light colour strip. In some cases I was able to access the seam and cut the darker fabric back but in most cases, because they have been sewn onto a foundation, that was not possible.
look carefully between the leaf on the top left and the blue flower - you can see the edge of the black fabric
In my own work (all three quilts), I have gone for minimalist quilting. I have seen many quilts in the past couple of weeks that have been closely quilted with straight parallel lines and I have fallen for that look so I decided to try it out on a couple of the pre-sewn string blocks. I discovered something along the way: if I quilt where the dark line of fabric can be seen, it can be disguised.

While not actually gone, the dark edge has been disguised!
I'm having way too much fun!

Monday, 8 August 2011

busy quilting

DD and I spent some lovely time together over the last few days.

On Thursday, when I returned home from the Caring Hearts Community Quilting Group (CHCQG), she was already here.

We didn't get much time for sewing for the rest of the day - instead we spent the time looking through the fabrics that I had brought home with me. In the evening, DD knitted and I continued to sew the binding onto the quilt I had been asked to complete.

I began the binding at CHCQG. I had taken my embroidery scissors, a couple of needles, a needle threader and binding clips to the group with me, but had to borrow thread as I wasn't told to bring my own. The thread I borrowed was ecru, the binding I was sewing was blue. My hand-stitching is not too bad but that light coloured thread stood out against the blue like a "sore thumb".

So, when I got home, I found some blue thread and finished stitching down the binding with that. Then I re-sewed all the stitches I had already done and removed the ecru stitching. I finished it on Friday afternoon while teaching DD how to make QAYG string blocks.

Here is the quilt - please remember this is not my work; all I did was stitch down the binding.

finished size approx. 60" x 45"
This quilt reminds me very much of the warm/cool quilt-along which has been very popular in quilt-blogland recently. We'd better take a look at the back that shows that yes, there is binding - it's the same colour as the front border.

On Friday, DD and I went to the Mad Quilters Gathering. I went looking for specific fabrics that I wanted but didn't see any! All I ended up buying was a quilter's tool for making half square triangles and some spare blades for my rotary cutter.

DD and I both spent some time at the Gathering sewing a block for charity. For DD's block, she had to sew two borders around an appliqued patch. My choice was a four patch which was a little bit of a challenge because each of the four patches was made of three strips of fabric and I knew they had to be reasonably accurate so that the points would meet properly. I was so please to get a perfect intersection between the four patches. Unfortunately, I had not taken my camera and I didn't think about DD having one on her phone so there are no photos of our work!

When we came home, DD (who hasn't sewn for several weeks) was well and truly bitten by the sewing bug; especially since she had been sewing on a Husqvarna Sapphire machine. She was very excited when I taught her how to make a QAYG string block and she was allowed to use my new sewing machine, even though hers was right there in the same room. Her first attempt is on the left - perfect, as I said before, but a little bit "safe" (as was mine). She became much more adventurous in her second and third blocks.


You've already seen my first block on this post; it looks very boring in comparison to the five I have made since.
Hey, Kate; do you recognise your scraps here?

They are very easy and work together well. I just have to remember to check the back of QAYG block every time I sew a seam - sometimes I don't keep the back as flat as I should!

As many blocks as I can fit in a 500g post pack will be sent to Oz Comfort Quilts; the rest (if any) will be added to and made into a quilt for CHCQG.

We also spent some of Sunday afternoon cutting more foundation pieces (11" square) and further sorting our strings into three different containers: over 15", under 6", and those in between. Of course, the more blocks we make, the more crumbs we make - they have their own containers too: one for "triangles" (or pieces roughly shaped like triangles) and the other for more rectangular pieces.

All in all, a very productive, and highly enjoyable, few days.

Monday, 25 July 2011

ready for blast off

Seventeen month old Older Grandson (OG) doesn't much like having his nappy (diaper) changed. He has long since outgrown the change table and is usually changed on the floor by his parents or WM, or on a bed by me.

OG squirms and wriggles and tries to escape. Usually that's okay, we're bigger and stronger than he is, but there are some nappies (diapers) that need an octopus to change them!

In 2007, long before we thought of our little girl getting married and having children, we bought beige carpet! Yes, that's right, beige! It stains very easily (despite being marketed as "stain resistant"). To protect this expensive (read: not to be replaced for a long time) asset, DD and I made two play quilts, one 36" square and the other 50" square, to catch the dribble, milk-chuck and other stuff that comes out of babies' mouths (and lower ends).

But quilts take a while to line dry so I wanted something that could be laundered more easily. (Yes, we have a dryer but we hardly ever use it; line drying is normal in Australia - this is the land where the rotary clothes hoist was invented!!)

On Saturday I cut some of this flannel

and some of this flannel

and sewed them together to make this

87cm x 55cm (35" x 22")
... the first of two change mats for an active, growing, not-yet-ready-to-be-toilet-trained boy.

I had such fun quilting this using my walking foot and having the machine on very slowly (I got faster as I went on); I also used Jan's ability to drive herself leaving me to concentrate on what my hands were doing!

I only wish I'd used a different coloured thread so I could see my work! LOL

Thursday, 21 July 2011

getting to know your machine

It's been a little over three weeks since Jan came to live with me.

Last night, I had the first of my two "getting to know your machine" classes.

First, we were told about needles and threads. Ball point needles separate the threads and go between them, sharp needles just piece the threads. Did you know that it is the sharp needle pushing through your fabric, splitting the warp and weft threads that causes all that lint inside your machine?

Did you know quilters use cotton thread because it has no give? Quilts don't need to give at the seams like clothes do, which is why garments are generally sewn with polyester thread. And rayon thread is used for decorative stitches.

We were shown how to wind a bobbin and insert a bobbin correctly. All nine participants had top loading bobbins, so that made it easier for the teacher. In fact, seven of the nine participants had Janome machines (the other two were Husqvarna).

We were shown how to thread a machine and then we had to wind our own bobbins and thread our own machines. We were then encouraged to try out the stitches on our machines while the teacher came around and explained the various features of each individual machine to its owner!

After some time spent playing with stitches, the various types of foot and their purposes were explained. We were then shown how to sew a buttonhole which we had to follow up with a button hole of our own. How easy they are these days; a far cry from the four step process of my old machine!


Finally we were shown how to blind hem. Since there is little call for blind hemming on my quilts, I asked the teacher if she would show me how to attach the free motion foot correctly. I have broken one needle in three weeks (actually it was in the first forty-eight hours) by incorrectly attaching this foot.

So, while the other participants sewed blind hems - should that be blindly sewed hems? (LOL) - let's try:

So while the other participants practised sewing hems using a blind hemming stitch, I practised sewing free motion circles (not as easy as it sounds) and attempted to free motion quilt my name.


I think more practice is needed!!

Next "getting to know your machine" class - 21st September, in which I learn to use the "memory" on my machine.

Wednesday, 6 July 2011

older Brother came back / fabric combinations

On Monday, older Brother returned from his ten day stint away from home. He's been serviced and is ready to go!


He doesn't look much smaller than his new sister - but check out the difference in the width of the throats! So far as these flannel fabrics go, Leonie, Jessica and Cindy you were all right: I am going to use the spacemen and the red with white stars together.

Since I love the stripes and WM wants me to use the green star fabric (hi Lara and Inigo), they will be paired together too (right again, Leonie!).

Saturday, 2 July 2011

sewing related goodies

This is the box that Jan needs to carry with her everywhere she goes. Neat, isn't it?

The missing foot is the 1/4 inch foot; Jan is rather attached to it at the moment!

And I guess I should get into the habit of using this! After all, we don't want Jan to get cold or dirty!

When I bought my sewing machine I also bought this:


I don't know how much my new machine weighs but there would be no way I could carry it around without the trolley bag. This one was a particularly good deal - it is a metal-framed bag, which makes it more expensive (and heavier) but there is a small rip in the back of the mat case so I got it at a really good price. That's okay with me - my mat lives on my cutting bench and I never take it class: there are mats in the classroom and there is no space to put another one! Besides, my mat is 35" x 23" and therefore too big for the mat case.

The trolley bag by itself weighs 8.8 kilograms (19.3 pounds); I'll need a hydraulic lift to get it in and out of the car.

I also bought some extra bobbins - look at the bottom right corner, isn't the box cute?

This is special packaging for Janome's 90th birthday. It holds twenty-five bobbins.

Janome's deal on the machine included a pair of dressmaking shears - I have a pair of left-handed shears so these will go to DD.


When WM jokingly said the shears would be good in the garage, the manager of the shop gave him three pairs of scissors as a gift! They've gone to the garage and I can't find them to take a photo!

The dealer from whom I bought the machine threw in a few goodies for me too:

a "purple" sewing box (which I have opened since this photo was taken)


this cute little tin


...containing four spools of Gutermann cotton thread in neutral colours

and 6 fabric sandwiches (half a metre in each sandwich and one of them is purple)!

The print on the three printed fabrics looks like this:

Not something I would choose for myself but, as my mum used to say, "beggars can't be choosers"!

Now to choose a project ...