Showing posts with label appliqué. Show all posts

Tuesday, 10 February 2015

it’s February and some people’s thoughts turn to hearts

This is not the story of a finished quilt, so I hope Val will forgive me – but the Tuesday Archives link-up at Val’s Quilting  Studio looks like so much fun, I couldn’t help wanting to be a part of it.
Val's Quilting Studio

I have to say, this soon-to-quilt-top is one of my favourite projects ever and I’ve blogged about it several times but it’s never had it’s own post.

In 2011, DD and I , with two month old Younger Grandson, made the hour and a half trek across Sydney for the inaugural meeting of what was to become the Sydney Modern Quilt Guild (now the Sydney Modern Quilt Group). We needed a hand-stitching project to keep us busy (well, DD had her hands full anyway) during the three hour meet-up. I had recently acquired an Accuquilt Go! Baby and had been keen to try it out.
opened ready for use

I’m glad I learnt how to do fused appliqué in the few quilting classes I had taken at that point. I had also done embroidery in my past which, of course, included blanket stitch. Putting the two skills together, I was able to work on some of these:
2012 Sep 6 two hearts done

Over the years, DD and I carried appliquéd hearts to meetings of the Caring Hearts Community Quilters and eventually I had thirty blocks done. But they were only 6” (yes, I was a new quilter and forgot to add seam allowance when cutting the squares) so I needed more blocks – or I needed to enlarge them somehow.

Inspiration came from two sources: a chance overhearing of a comment from someone in our quilting group  on the merits of appliqué and/or scrap quilts; the other from the Dresden wedding quilt made by Jess at A Quilty Habit.

I enlarged my blocks and  made them scrappy!
2013 red block with border

And I worked on the layout until I came up with this:
blocks done and final layout

So, the obvious question is: if I love these blocks and this layout so much; why has the project stalled?  Well, firstly, we moved house! That slowed all projects down for several months! But, more importantly, I know I need to add white sashing between the blocks but I'm not sure how I want to quilt it (using a walking foot; FMQ is out of the question for now). I think I want to echo quilt around the hearts but dragging the whole quilt though my domestic machine (even though I have a 9” harp space) doesn't inspire me so I’m considering QAYG row-by-row (gasp!)

What would you do if you were a novice quilter with little FMQ ability?

Friday, 21 December 2012

2013 – “the Year of the Finished Project” UFO Challenge

As you may know, I have decided that 2013 will be the Year of the Finished Project.

I even had some fun creating a button and writing some html code for it (thanks to Jennifer at Ellison Lane Quilts for the great tutorials).
Never Too Hot To Stitch!
The butterflies are a reminder that some things can, and should, be transformed!

My plan is to finish two projects for every new project started.

I am going to set up a linky party on the first Thursday of the month for anyone who wants to join me.

The only rule is that you must finish at least one UFO or WIP before you start a new project! Don’t worry, I’m not going to haunt your blog to see if you are following the rules. Winking smile

The party is open to any form of stitching: knitting, crochet, quilting, sewing, dress-making, embroidery, applique, cross-stitch, etc.

Participation is simple:
  • On the first Thursday of the month, nominate a project (or projects) that you are going to concentrate on and see finished. Tell us a little about the project/s, where you’re up to, why it stalled, etc.
  • In the same post, give us a progress report on the project/s you undertook in the previous month/s.
  • Include the button above on each post. The code is under the tab “2013 – The Year of the Finished Project” at the top of my blog.
  • Link back to this blog with the URL of your blog post, not your full blog. People want to read about progress, not spend time searching for the relevant post.
  • Read and comment on some other blogs that link to this party!
  • You don’t have to get your project/s finished in one month, some bigger projects take longer, and sometimes life just interferes with our stitching!
  • You can finish one project in one craft and start another in a different craft if you wish. For example, you may finish a cross stitch and start a quilted table runner.
I've never hosted a linky party before so if you have any comments or questions, please feel free to suggest or ask. Please make sure you leave a contact email address so I can get back to you!

Wednesday, 19 December 2012

works in progress (or not)

Warning: poor quality photos – I had to use my iPad because my camera batteries were all flat!
~~~~~~~~~~~~~~~~
At the beginning of December, I published a list of my December WiPs. It looked like this:
  1. The Very Hungry Caterpillar quilt
  2. Christmas Tree wall-hanging
  3. Cardigan for Me
  4. Deb’s Diamond Blanket
  5. Merlot Toe Up Sock
  6. hexagon project bag
  7. Scrappy Rainbow improv quilt
Then came the fiasco which was my packing of craft activities for my week away.

But I did manage to finish the second Merlot Toe Up Sock while I was away. Not having my basic knitting tools with me meant that I had to wait to sew the ends in till I came home!
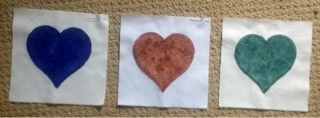
I also mentioned that I took my appliqué heart blocks away with me instead of the hexagon project bag that was on my original WiP list. With stitching time on the train, at embroidery class last week and sewing class this week, I have managed to finish the appliqué on the last few blocks (three of which are shown here).
The ten-hour travel time also gave me a chance to think about the setting of these blocks. I am going to try setting them alternately with the four patch blocks I have made for the Rainbow Scrap Challenge, and use the Rainbow String blocks for a piano-key-style border. Well that's the theory anyway!

An incredibly busy and tiring week followed my return home – I am so tired that I don’t have the energy for most craft activities and so fall back to my good old stand-by: knitting.

I have done a little on the right front of my cardigan.
But this lace pattern, as easy as it is to memorise, requires concentration. I can’t knit it when there are people around!

And so, I have been working on the Drop Stitch Scarf I started while away. I don't really have to think, except to count the yarn overs in one row out of four.
The scarf is progressing quite quickly considering my lack of enthusiasm for this project – the acrylic yarn is not pleasant to work with!

And so my list now looks like this:
  1. The Very Hungry Caterpillar quilt (no progress)
  2. Christmas Tree wall-hanging (today’s project)
  3. Cardigan for Me (some progress)
  4. Deb’s Diamond Blanket replaced with Purple Dropped Stitch Scarf (much progress)
  5. Merlot Toe Up Sock (finished)
  6. hexagon project bag replaced with appliqué blocks (finished)
  7. Scrappy Rainbow improv quilt replaced with Scrappy Rainbow “hearts and four-patch” quilt
Just as well I realised at the beginning of the month that there was no way I was going to get all these finished by the end of the month. The list was supposed to focus my activities and, despite my swapping some projects for others, I have managed to stay focused and achieve some progress. At least I swapped and didn’t just add to the list – six or seven is the limit; after that I become overwhelmed!


Friday, 7 December 2012

the best laid plans

This post could also have been titled "thinking is not the same as doing"!

Knowing that I was going to be away from home for the best part of six days, I did a lot of thinking about what projects I would take. I even blogged about my WiPs in my last post and hinted at which ones would be travelling with me.

We had an unexpected visit from the family late in the afternoon and into the evening of the day before I left. It was late by the time I packed. I included three craft projects -- the ones I had been thinking about for days.

After climbing into bed around 1am, I realized that taking my hexagon project with me wasn't going to work (for a variety of reasons) so I got out of bed, took it out of my carry-on luggage and replaced it with my appliqué hearts blocks. I knew that there were still about a dozen hearts that needed to have the blanket stitch added. I also knew that everything I needed - blocks, embroidery floss, needles, threader and scissors were in the case ready to go. But appliqué isn't the best choice for crowded waiting rooms -- what I needed was knitting.

Back in bed, I realized that it would be a good idea to take another ball of sock yarn, just in case. Socks are such a quick knitting project and I might just get the one I had already started finished. I couldn't be bothered getting out of bed again, I was sure I'd remember in the morning but, of course, I didn't! As I said, thinking is not the same as doing!

I turned the heel on my first night away so I had only the leg to go, easy knitting; easily finished in a day or two.

However, there shouldn't be a problem. I had bought my cardigan and hadn't finished the first ball of yarn. The project was packed with one additional ball of yarn -- ready to go!

On the train I knitted some of my cardigan. I found a knot in the yarn, two rows short of a logical ending point. So I unpicked to the beginning of the row and reknitted that row and the next. There is no way I would have had enough yarn to knit another row but I had reached that "logical finishing point" so that was okay. It was then that it occurred to me that I shouldn't travel without knitting essentials -- a tapestry needle and some waste yarn, for example. The next instructions were to thread the live stitches on to waste yarn. No worries, I was on my way to mum's -- she is a knitter and therefore has such things.

I borrowed what I needed from mum and then the reality of "thinking" instead of doing (also known as packing in a rush) hit me -- I was about to work on my cardigan fronts and I needed two balls of yarn; I had only brought one. Okay, so I'll knit one side now and the other when I get home -- it's only a few days away after all.

Are you tired and bored with this story yet? It only gets more interesting! When I bought the yarn, I had no idea how much I would need to knit myself a cardigan so I bought all that they had in one dye lot. That was 13 x 50g balls which didn't seem like enough so I compared the other balls which were from two dye lots. One was definitely different and the other was pretty close; so close in fact that, under the lights in the Big Box Store, I couldn't see any difference. So I did what we tell new knitters not to do -- I bought two balls from a different dye lot! You know where I'm going with this, don't you? The one ball that I packed is one of those two balls! So there'll be no knitting on this cardigan until I get home!

And so I turned to good ol' mum again. She's a knitter so she has stash (of course she does, I buy it for her!). She gave me a 100g skein of gorgeous (the colour not the fibre) purple 8ply (DK) acrylic yarn and I chose 4.00mm circular needles from her collection. I knit loosely and that's the recommended size on the ball band. I knew I would have access to the Internet here at the motel so I was pretty sure I would find some kind of pattern on Ravelry.

Well, who knows that a child's jumper takes more than 310 meters of 8ply yarn? I found only one pattern I even began to like and started knitting it. What a disaster! The yarn is very thick and the baby jumper, knitted in garter stitch, was as stiff as a board. It didn't help that it was knitted from the top down and the cable on my 60cm (24") circulars was so thick I couldn't do magic loop! It also didn't help that the free pattern was poorly written!

And so I ripped out that harsh, beautifully colored yarn, and it is now becoming a Drop Stitch scarf! (Ravelry link) I hope it softens up in the washing/drying process -- I wouldn't want it around my neck the way it is!


The moral of the story is (and I'm talking to myself here because none of you would ever do what I have done) -- pack in advance of a trip away. Don't just think about what you'll need, read through every step of a pattern and pack for every contingency!


Friday, 7 September 2012

planning + preparation + process = product


There is a certain amount of planning and preparation that has to take place before embarking on any project, whether a craft, a chore or a home renovation.

In a recent post, Carla of Lollyquiltz talked about preparation in relation to making quilts for “free” from leaders and enders.

Interestingly, I had been thinking along the same lines myself. You see, yesterday was one of the two monthly meetings of Caring Hearts Community Quilting group. I needed a hand stitching project to take along with me. I had finished the last of the appliqué heart blocks last month so I knew I needed to prepare a few blocks.

So, on Wednesday I decided to prepare all the blocks for which I had already cut the fabric –- if i was going to get everything organised to do a couple of blocks, I may as well do them all, right?

It was during this time that I realised just how much preparation goes into quilting projects.

If you are not a knitter, you may not know that the planning stage for knitting and quilting is the same. There is the choice of pattern and materials (whether yarn or fabric) and the gathering together of the necessary tools.

But here the similarity ends. In most knitting situations, once the tools, the yarn and the pattern are gathered together, the knitter can cast on and go straight to the process of knitting. Sometimes hanks or skeins have to be prepared by winding into balls or yarn cakes, but that’s usually about it.

Compare this with the above mentioned hand-appliqué project. I had already cut 18 x 4.5” squares of fabric. Let me walk you through the rest of the preparation.fused heart
  1. Measure and cut 18 x 4.5” squares of iron on fusing.
  2. Set up the Accuquilt Go Baby, the die and the cutting mat.
  3. Put all 18 slippery squares through the die cutter. Throw the outer border in the bin, stack the curling hearts (yes, my fusible comes in a roll).
  4. Put all 18 fabric squares through the die cutter. Throw the outer border in the scrap bin, stack the fabric hearts face down.
  5. Turn iron on to heat. (The ironing board is always up in my sewing room).
  6. Pack up the Accuquilt Go Baby, the die and the cutting mat.
  7. Place one Teflon sheet on the ironing board. Place fabric heart (face down) on sheet, line up fusible, hold tight, cover with second Teflon sheet (I don't want glue on my iron or new ironing board cover), press.orange
  8. Lift top Teflon sheet, place another heart (face down) on bottom sheet, line up fusible, replace top Teflon sheet, press.
  9. Repeat Step 8 twice more.
  10. Lift top Teflon sheet, remove first pressed heart (which is now cool enough to touch) at end of ironing board. Repeat Step 8.
  11. Repeat step 11 until there are no more hearts left.
  12. Cut away any excess fusible hanging outside the fabric.
  13. Remove white fabric from drawer. Press.
  14. Take to cutting table. Cut 18 x 6” squares. Stack squares as you go.
  15. Take squares to ironing board.
  16. Place white square on Teflon sheet (still on ironing board). Remove paper from back of heart. Centre heart on square of white fabric using a 6” square ruler to make sure everything lines up correctly. Hold in position, cover with second Teflon sheet. Press.
  17. Remove top Teflon sheet. Pick up white square by corner (keeps the square clean and stops me from burning my fingers on the still hot glue) and move to skinny end of ironing board.stored straded threads
  18. Repeat Steps 15 and 16 seventeen more times, stacking the white squares between each pressing.
  19. Wipe excess moisture from Teflon sheets, roll and store.
  20. Take out the cases of stranded cotton and open them. (In case you are wondering why one is crammed full and the other is not, the case on the right holds the threads of my current cross stitch project).
  21. Find a thread colour that closely matches the fabric of each heart. Go for something slightly darker if an exact match can’t be found. Put aside any heart where no match can be found (a trip to the LQS or Big Box Store will be needed).
  22. Put the hearts that have been matched into the project case, put the matching bobbin of thread into a zip-lock bag.
  23. Put the cases of thread away.
  24. Check that there is a packet of needles, a needle threader, a pair of scissors and a container for scraps in the case before closing.
stitching in progress
The eighteen squares are now ready for hand-stitching! I could have knitted a six inch square with a heart motif in the time it took me to do all that - just as well I love what I do!

Have you ever thought about how much preparation time goes into your sewing projects?

Friday, 1 June 2012

the eleventh question

warning: long, photo-heavy post (hurrah for the new internet connection and Windows Live Writer!)
~~~~~~~~~~~~~
Yesterday I answered ten of the eleven questions posted by Freda (a.k.a. Impera Magna) on her blog The Adventures of the Empress of the Universe.

I had to leave the last question because it needed a post of its own (as you will soon see).

Q. How many UFOs/WIPs do you have right now?

A. Let’s begin with the sewing based ones …

1) The quilt that has been occupying my attention this week is my Country Houses quilt which started life as a single (twin) bed quilt in May last year; it’s too big for a single bed so I decided to finish it to queen size to go on our bed to keep me warm on these chilly winter nights. As you can see, it’s way too big for our bed! I am considering taking one or two rows off but, as yet, have not made up my mind!
on the bed - too big 
2) Scrappy Log Cabin: I don’t have enough scraps to make the border I intended and am still thinking about what to do with it. Here it is with the inner border which has been added since I last showed the top-in-progress. It looks black but it is actually a dark brown because, despite all those blues, the quilt has an overall brownish look.
2012 Scrappy Log Cabin with inner border
3) A cloth book I started for the Grandboys for Christmas (they got two of four before I became really ill a couple of weeks before the big day) – I need to unpick the last page I sewed; so it has been having time out in the “naughty corner” since November. This is the page I haven't got to yet!
2011 Saeari underway
4) curtains for Older Grandson’s bedroom – his mummy needs to find the hooks WM accidentally left there and I’m not finishing them till she does! (no photos here)

5) Dotty Bright needs basting and quilting
2012 finished Dotty Bright top_thumb[1]2012 back for Dotty Bright
6) Scrappy Strings II: the top and backing have been made but are too long (Is this a theme emerging in my quilting? I hope not!) so I need to unpick the bottom row of blocks and cut down the backing then baste and quilt (it’s been spending time in the “naughty corner” too)
quilt top finished_thumb[4]pieced backing for Scrappy II_thumb[4]
7) and 8) two scrappy quilts made from one donated partly-made flimsy; I don’t have anywhere near enough scraps to finish either of them (the flimsy was separated between the long floral strip and the yellow strings)
two quilts in one_thumb[4]
9-13) five rainbow quilts which are being made as part of the Scrappy Rainbow Challenge over at SoScrappy; I have blocks in various colours for a four patch quilt (17 blocks made), a nine patch quilt (11 blocks made), a string quilt (15 blocks made), an improv quilt (44 blocks made) and a Wonky Windows quilt (9 blocks made). Obviously, these are long term projects!
2011 red four patch_thumb[5]2012 green nine patch_thumb[3]2012 pink strings_thumb[5]2011 purple improv_thumb[4]2011 brown Wonky Windows_thumb[5]
14) Hearts quilt: this a shared project with DD; we are hand-stitching applique hearts onto white squares – eventually we will have enough for a quilt! This began as a project to take to Guild meetings and for me to take to meetings of the “Caring Hearts Community Quilt Group” when I don’t have any quilts that need binding.
orange_thumb
15) a cover for my fold-up cutting mat (originally used for dressmaking, now mostly used under a white plastic tablecloth to block my knitting)
cutting board covered_thumb[1]cutting board folded_thumb[1]
– I am going to use the embroidery I started in class in April; I just have to finish the satin stitching of the butterfly  then I will decide which fabrics I want to use to piece what will be a large drawstring bag (probably lined)
2012 archway embroidery nearly done2012 archway embroidery butterfly in progeress detail
16) Sampler Quilt: I cut out the pieces for the first block in class on Monday so I guess it’s now a WIP!
pieces and plan for Domino block
17) a long-untouched cross stitch which I really ought to get finish, it’s so close to being done! I just have to finish that sheet music (dozens of cream stitches on a white background), the scroll-work music stand and a little more of the piano keyboard to the left then I think it’s finished.
piano cross stitch

… and then there’s the knitting WIPs …

right now I'm knitting a pair of  men's mitts which I will finish today, then I need to revisit the following projects:

18) a pair of gift socks (I can’t say any more, just in case; deadline 22 June)
2012 mum's baby cable rib socks detail
19) and 20) socks for me
2011 Purple Cocoon Ribbed Ribbon socks        2011 Soft Blue socks detail
22) Merlot toe-up socks for someone with big feet (I knitted the first sock on 72 stitches instead of 64)!
2011 Moda Vera Merlot sock in progress
23) baby blanket (which I am considering frogging – it’s just not working for me!)
OLYMPUS DIGITAL CAMERA         OLYMPUS DIGITAL CAMERA
22) intarsia blanket (I haven’t seen this for a couple of months and was considering ripping it out but now I’ve seen the photo I’m loving it!)
2012 Intarsia Blanket in progress
24) sideways striped jumper – need to pick up stitches and do the collar
Mexicali Baby
25) Ambassador of Love mittens (second mitten syndrome) – I finally located the yarn for the second mitten yesterday! Now I just have to find or download the pattern again!
2011 Ambassador of Love Mittens #1
26) Lace Infinity Scarf which I am also thinking about frogging;  the yarn does nothing for the lace pattern – perhaps a dark colour was a poor choice?
2011 Simple Lace Infinity Scarf
I guess it’s time to crack on with the stitching!