Showing posts with label scrap quilts. Show all posts

Friday, 27 May 2016

two finishes

Hello

I've moved home. Please find my new blog and the post of this title here at Wordpress. While you're there, you may like to sign up to follow me at my new address. Thanks.

Here's a taste of what you'll find at my home.
Attic Window Pinwheels finished back

Wednesday, 11 November 2015

finished flimsy

In September, DD and the Grandsons came to visit for two weeks – which was wonderful. It seems so much longer than five weeks since they left. After his experience at Easter time, Older Grandson wanted to sew! This time, Younger Grandson wanted to sew too – but the truth is, he just wanted to be allowed to play with the buttons and dials on my sewing machine!

Older Grandson decided that since he had made blocks from strips last time, this time he was going to make blocks from squares. He chose my container of 3” squares. There was no way that I was going to be left making a quilt entirely from 5” four-patch blocks (b-o-r-i-n-g), so I looked through a book which I later gave to DD (so I can’t tell you what it was called – WM found it at work and brought it home in case I was interested in it) and decided to make a block comprised of two four patches and two units containing half-square triangles. In the unknown book, the block is called “Road to California” but in my “Encyclopaedia of Pieced Quilt Patterns” by Barbara Brackman, the block with this name is a nine-patch block. I couldn't find the block we were making in the Brackman “encyclopaedia” but I eventually found it on EQ7 as “Road to Oklahoma”. The version we made has a light square in the corner where EQ7 has a dark square but, essentially, it is the same block.

OG quickly lost interest when he realised that more care had to be taken when choosing a light square and a dark square (as opposed to randomly selecting any strip) and aligning them carefully before sewing them together. He also realised that all his younger brother was doing was pushing the start/stop button and so that’s what he decided to do too! Therefore, I really can’t say this time that the blocks were made by either grandson. DD, too, lost interest because of the matching of points that has to take place – she’s a perfectionist and if it wasn't exactly right she got frustrated (I can live with a millimetre or two out!) So, in essence, I made the entire flimsy.

At first, I really didn't like it. The lights and darks weren't working as I thought they should. It just seemed too scrappy, too disordered; I like scrappy but need it to be controlled somehow -- usually by the pattern of lights and darks, and this just didn't seem to be coming together. I still don’t have a design wall so I have to use the floor to see what I'm making. Because the blocks were ten inches finished, I needed to have five and a half blocks across and six and a half blocks down to make the flimsy within the size requirements of our quilt group. I, therefore, could see no other way to set the blocks but “straight”; that is, every block (or half block) facing exactly the same way. If I’d had an even number of blocks both ways, there all kinds of permutations on EQ7 that I could have used. But it was not to be!

What is surprising is how quickly this came together; especially considering there 715 pieces in this quilt top. I really didn't want to work on it but had to keep moving the finished blocks and part-blocks every time I wanted to do something else (like play the piano or use the computer). So I bit the bullet and got to work on it. It took three days but I finally completed it last Thursday. So, here for your viewing pleasure, is my Road to Whoopi flimsy. (“Whoopi” is the nickname given by the locals to Woolgoolga, the town where DD, SIL and the grandsons live). Don’t look too closely then you won’t see all the places where the points don’t match exactly! ;-)
2015 R2W flimsy

It’s not by favourite quilt by any means but, seen in this photograph, the lights and darks are working as they should and the extreme scrappiness is under control. I think I'll quilt it with a light thread through the diagonal light squares (going down from left to right) and with a darker thread through the diagonal dark squares (going the opposite way). But first, of course, I have to make a backing.

Hopefully, I'll be back sooner rather than later to show you either the finished quilt or some photos of our garden or of the grandsons on their recent visit.

In the meantime, may your stitching bring you joy.

Thursday, 12 February 2015

pretty (scrappy) in pink –- a work in progress

Deb, who blogs at A Simple Life Quilts, and I were email-chatting the other day about quilts in progress. I mentioned that I had a pink and purple row-by-row quilt in progress and should pull it out, given that the colour for the Rainbow Scrap Challenge for this month is pink.

This is the story:

Last year, I wanted to learn curved piecing in my quilting class; at the time pink was the colour of the month. I chose to make scrappy pink blocks (hey, why not try something a little more complicated when you're learning a new technique? LOL) So I made these blocks based on an idea in Scrap Republic by Emily Cier. Each of those Drunkard's Path blocks is 4.5”.
curved piecing completed
I laid them out in a traditional style Drunkard’s Path meander but I didn’t like it so I turned them into circles (as the photo above suggested).
circle blocks completed
I realised I didn't like making four-inch curved blocks enough to make a whole quilt so what was I to do? Make a row-by-row quilt, of course.

Some of my classmates and I went on to do foundation piecing: it  was still February so guess what colour I used for my foundation piecing?

Here are the four blocks I’ve made so far:
first four foundation blocks 10 Feb 2015

I still have two more to make; they will have the same fabric in the centre. Then I’m not sure whether or how I will sash them.

At home during February, I thought I would use some more of my pink scraps in a new-to-me piecing style: tumbler blocks – here are the first five joined
first column of tumblers joined

and here they are on my design wall (at the old house) in the layout I had chosen:
2014 pink tumblers

Since then I’ve realised I need to go wider with only five rows of blocks (hence the five joined together above).

Kate, who blogs at Kate’s Quilting (and other arty stuff), and I shared a couple of emails about scrappy quilts generating more scraps and that was certainly true of my Drunkard’s Path blocks – there were a lot of scraps left over. So what would I do with them? Turn them into improv crumb piecing, of course!
first pink blocks first purple
They’ll go on the back of the pink and purple row-by-row quilt; I can’t help sneaking a bit of ‘modern’ piecing into the backs of my quilts (look here for an example). Because most of them go to older people in palliative care units, we tend to be fairly traditional in our quilt making – but I always put a signature panel in the back of mine which tends to be a bit modern looking! This probably won’t be so much a panel as scattered; like this one (Icy Improv Pods by Elizabeth Hartmann of Oh! Fransson) or this one (though not as detailed as this which is Faraway Fields by fellow-Australian, Jules, of Procrasticraft).

So, this row-by-row is the project I’m adding to during this month of pink; and also in the month we have purple in the Rainbow Scrap Challenge.

I’ll be linking this post to Scraptastic Tuesday at Mrs Sew and Sow, WiP Wednesday over at Freshly Pieced blog, Needle and Thread Thursday at My Quilt Infatuation and the Rainbow Scrap Challenge (RSC) at So Scrappy blog as they go live this week.
WIP Wednesday at Freshly Pieced Scraptastic Tuesday
Needle and Thread Thursday
RSC 15
Are you joining any of these linky parties this week?


Tuesday, 10 February 2015

it’s February and some people’s thoughts turn to hearts

This is not the story of a finished quilt, so I hope Val will forgive me – but the Tuesday Archives link-up at Val’s Quilting  Studio looks like so much fun, I couldn’t help wanting to be a part of it.
Val's Quilting Studio

I have to say, this soon-to-quilt-top is one of my favourite projects ever and I’ve blogged about it several times but it’s never had it’s own post.

In 2011, DD and I , with two month old Younger Grandson, made the hour and a half trek across Sydney for the inaugural meeting of what was to become the Sydney Modern Quilt Guild (now the Sydney Modern Quilt Group). We needed a hand-stitching project to keep us busy (well, DD had her hands full anyway) during the three hour meet-up. I had recently acquired an Accuquilt Go! Baby and had been keen to try it out.
opened ready for use

I’m glad I learnt how to do fused appliqué in the few quilting classes I had taken at that point. I had also done embroidery in my past which, of course, included blanket stitch. Putting the two skills together, I was able to work on some of these:
2012 Sep 6 two hearts done

Over the years, DD and I carried appliquéd hearts to meetings of the Caring Hearts Community Quilters and eventually I had thirty blocks done. But they were only 6” (yes, I was a new quilter and forgot to add seam allowance when cutting the squares) so I needed more blocks – or I needed to enlarge them somehow.

Inspiration came from two sources: a chance overhearing of a comment from someone in our quilting group  on the merits of appliqué and/or scrap quilts; the other from the Dresden wedding quilt made by Jess at A Quilty Habit.

I enlarged my blocks and  made them scrappy!
2013 red block with border

And I worked on the layout until I came up with this:
blocks done and final layout

So, the obvious question is: if I love these blocks and this layout so much; why has the project stalled?  Well, firstly, we moved house! That slowed all projects down for several months! But, more importantly, I know I need to add white sashing between the blocks but I'm not sure how I want to quilt it (using a walking foot; FMQ is out of the question for now). I think I want to echo quilt around the hearts but dragging the whole quilt though my domestic machine (even though I have a 9” harp space) doesn't inspire me so I’m considering QAYG row-by-row (gasp!)

What would you do if you were a novice quilter with little FMQ ability?

Wednesday, 10 December 2014

Jacob’s Ladder goes Barn Raising

I had already begun to write this post when I found a link on Sharon’s blog, Vrooman Quilts, about the Scraptastic Tuesday party going on over at She Can Quilt blog. If there’s anything I do know, It’s scraps; so joining in sounded like fun. When you've finished reading here, why not take a few minutes to pop over and see what other people are doing with their scraps?
Scraptastic Tuesday

Over the weekend, I cut and stored all the orange scraps shown in my last post. I pressed the contents of three of those shopping bags screaming at me from under the ironing table.
bags in waiting

For now, they are in two trays, waiting to be cut and stored.
 black and white scraps waiting 
Before class on Monday, I decided to sew some small scrap triangles together – my container of triangular off-cuts (from flying geese, braids and string blocks) was getting quite full.
small triangles filling up

I’m thinking I’ll make some blocks called “Cotton Reels” but don’t hold me to that!
Cotton Reels quilt block

I began to put together the four-patches to make what I thought was the Jacob’s Ladder block in class on Monday. Traditionally, the Jacob’s Ladder block is a nine patch, consisting of five four-patch units and four HST units.

In Scrap Quilt Sensations, Katherine Guerrier uses a four patch block to make a Jacob’s Ladder quilt.
diagram

I didn’t think to take the book to class and my teacher and I ended up having a long discussion about how the block went together. In the end, my block is a four-patch but not the one Katherine Guerrier uses!
one block 
Now, I had several choices:
  1. unpick the sixteen blocks I had done and make them up correctly according to Katherine Guerrier’s diagram – no way!
  2. add units to my four-patches to make a traditional nine-patch JL block – maybe!
  3. go with a different layout using the four-patches I had made – yes!
When ‘mistakes’ happen, what happens next comes down to two things: is the resulting quilt of an attractive design, and is my time being used wisely?

Option 3 was not only the easiest but also satisfied both my criteria. When making quilts for donation, quick and easy but effective is often a good route to take given that I spend a lot of time in preparing scraps for use in the first place. The less time I fiddle around with unpicking and re-making, the more time I have to make other items.

In lieu of a fixed design wall and tired of crawling around the floor, I decided to be inventive! I still have the flannel-backed tablecloth that used to be my design wall (hanging in front of a wardrobe/closet) at our previous house. The rivets WM had attached to insert shower curtain rings are coming adrift and it’s fast outliving its usefulness as a hanging system. But those shower curtain rings gave me an idea – my design ‘cloth’ now hangs from our bathroom shower rail. The bathroom is used infrequently by WM and I so it seemed like a great idea and WM approved (at least as a stop-gap measure)!

See how the second, third and fourth rivets are pulling away from the doubled-over-for-additional- strength fabric?
2014 shower rail solution

Here is my design wall in use: with the ‘barn raising’ layout of my Jacob’s Ladder quilt; possibly not traditionally but it works!
JL layout
I'm letting it sit for a while before I start putting the blocks together. In the meantime, I’m using leftover four-patches and HST units to make a panel to widen the the backing fabric.

What do you do when you make a “mistake”?
  • Turn it into a ‘design feature’?
  • Throw it in the naughty corner?
  • Toss it?
  • Or resolve it in some other way?


Saturday, 6 December 2014

scrappy Saturday

Scraps, as most readers would know, are the core of my quilting. I belong to a community quilting group that makes quilts for donation. We, in turn, have fabric donated to us. Very rarely do we get commercial pre-cuts; sometimes the donations consists of yardage, half-metres, quarter-metres, fat quarters or fat-eighths but most of the time (at least as far as I’m concerned) it is off-cuts, fabric with pieces cut out (for appliqué or English paper piecing) or bits of projects long abandoned.

A few weeks ago, a friend in my quilting class gave me two bags of fabric – she is downsizing and needed to pass on some of her stash plus some saved ‘bits’. I store pieces of fabric larger than a fat eighth in drawers by colour; here is my friend's donated fabric after I finished sorting it.
from Brenda Oct 2014
As I arrived at a class a few weeks ago, the owner of my LQS handed me some four-patch units she had been working with and no longer liked. She then handed me the rest of the fabric she was using. Obviously it’s not enough for a whole quilt and I don’t have much Japanese print fabric so I might pass this along.
from Gail Nov 2014
I like the challenge of making quilts from scraps and enjoy looking at patterns and interpreting them as scrap quilts. While working on my Jacob’s Ladder quilt, I realised that just turning or moving the blocks about would result in a different quilt. Very exciting – a new project on the horizon…

I have finished all the units  for my Jacob’s Ladder quilt – 100 four-patches and 100 HST 4.5” squares. Here they are, pinned in groups of ten (saves counting).
100 x 2 units done
What I need now is a design wall so I can start putting the quilt together – I think WM is going to make one as my Christmas present. I certainly have asked directly (I have found that dropping hints is not effective).

For more than two weeks in November I spent every moment in my sewing room ironing, cutting, sorting and storing scraps. I worked my way through purple, blue, red, pink, teal and green. In the middle of the third week, I got a bit antsy. I just wanted to sew, sew, sew and sew! That's mostly how all the units for Jacob’s Ladder were finished: it went from being a ‘leader and ender’ project to being my main project!

I have found a new leader and ender project -- my container of 3" squares is filling rapidly and I have an idea which involves four-patches and HST but not set as for "Jacob's Ladder" quilts.

I still have to sort through and cut a tray of orange scraps and a tray of yellow scraps (both already ironed). The bases of these trays are about 11” x 8” and are about 2.5”  deep so it’s probably not as bad as this photo suggests – I am working with scraps after all!
 orange and yellow ready
In addition, I have all these bags of scraps that are not ironed. These contain black and white scraps, grey scraps, floral scraps, bright scraps, brown scraps and light-neutral scraps. *sigh*  This is just what I need screaming at me from under the ironing board! I need to find a tub to put all these bags in and hide them away – at least temporarily!)
bags in waiting
At least when it’s all done, I will be much more organised and able to sew rather than search for fabrics, iron them and cut them! I am cutting scraps according to my scrap storage system which is both generic (square of all sizes from 2” to 5” in half-inch increments, triangles, strings and crumbs) and designed with specific projects in mind, like Solana Beach (free on Craftsy) and Make It Do (purchased from Craftsy). 

My Dutch Cap Hexie project continues slowly. I have removed some of the papers from the finished units and am spending ‘television time’ basting more hexagons. The last time I showed you this I had only seventeen units done;  now I have twice that. It takes me about an hour to add the seven diamonds to each triad of hexagons. At the community quilting group meetings, someone always remarks that I am still working on this project so I’ve taken to calling it my “100 year project”! I estimate that I will need 104 of these units to make a quilt of the size we donate so I’m going to be working on it for a while yet! Then I will need some half-hexies and some diamonds to make it square. I intended for the triad of hexies to point towards the top of the quilt but I can see that it might be easier to make rows rather than diagonals – I will have to think on it further.
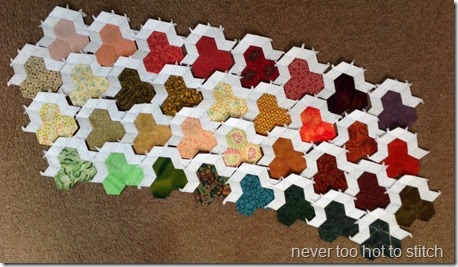
34 units done
I’ve barely done anything on the Rainbow Scrap Challenge this year because I  haven't been organised. Next year, I’ll be able to take the appropriate container of crumbs from the shelf and get sewing! What's more, I know exactly what block I’m going to make for the whole year!  Yahoo! I’m looking forward to that!

Meanwhile, my Relaxing Robin project, Canary on a Pinwheel, remains untouched. Why? Because I have to cut fabric for the flying geese units and I am over cutting for the moment!

What do you do with your scraps?
Use them?
Store them?
Give them away?
Toss them?

Friday, 28 November 2014

Let’s Book It!

VroomansQuilts
Way back in the dim past that was the beginning of this year, I decided that Sharon’s Let’s Book It linky party was a great idea. Sharon blogs at Vroomans Quilts, and was encouraging us to make something from all those quilting books, magazines and PDF files accumulating on our shelves and in our computer – you know, the ones we’ve bought or been given that we’ve never actually used except to admire the quilts.

“Great idea” said I, to myself. “But I’ve never made a quilt from any of my quilting books because I’ve never made a quilt from a pattern”. But Sharon’s idea went further – we were encouraged, if we so desired, to use a pattern for inspiration, as a springboard to another quilt.

I have admired this quilt in Quilts for Kids by Elaine Hammond ever since I saw the book on sale in the book store. Of course, it was the limited palette and the bold bright colours that got my attention; not the actual design of the quilt.
quilts for kids Jacobs Ladder kids 
Then I saw the same design in Scrap Quilt Sensation by Katherine Guerrier.
scrap quilt sensation Jacobs Ladder scraps
It’s an old, tried and true pattern – Jacob’s Ladder, made of four-patches and large half-square triangles. Katherine’s scrappy quilt may not be as striking as Elaine’s design but it does make use of something I have in abundance – scraps!

My friend, Deb, who blogs at A Simple Life Quilts, finished a Jacob’s Ladder quilt in October last year. Hers is made in Thimbleberry fabrics and is modern and fresh from the use of white to make the ‘ladder’ stand out. I love the way the choice of fabrics and treatments make the same pattern look so different!

Several months ago, I decided to make four patches from 2.5” squares as my ‘leader and ender’ project. I did the math back then regarding how many I would need to make the quilt the size required by my quilting group (48”-54” x 60”-70”) and worked out that I need ninety-something. It was just as easy to make 100, then I’d have more than enough. Some could always go on the back where I generally have a panel of some kind to widen the backing fabric.

In this post, I showed you that I had 60 four-patches completed; I now have the 100 blocks completed; and have moved on to making the half-square triangles from 5" squares. Trimming them down to 4.5" squares is the most time consuming part of the experience!

All I have done was match a dark fabric with a lighter fabric (which may well be a mid-toned fabric) and sew them in pairs, then I’d join the pairs together to make four-patches or sew the squares diagonally to make two HST. Making blocks this way is so easy; I’m really making two quilts at any time without taking my focus from the one that is my ‘main’ project. 

If you’re not into scrappy quilts, Jenny Doan of the Missouri Star Quilting Company has a video on YouTube for making a Jacob’s Ladder quilt the easy way using pre-cuts but you could use yardage instead.

Are you playing along with Let’s Book It? It’s not too late to join in the fun – this is my first link-up ; nothing like coming in at the end of the year! (LOL) Sharon intends to continue with this next year (yay); there are a few more books on my shelf and patterns in my PDF library that need my attention and I’ve even been cutting pieces in anticipation!

Tuesday, 25 November 2014

Relaxing Robin progress

Dawn hasn’t had a linky party for the Relaxing Robin this month – probably because she and I are the only ones doing it! You can still join in at any time; the details are on the tab at the top of my blog.

My 'progress' on this project has been slow. October was a non-sewing month for me and most of time in my sewing room this month has been taking up by ironing, cutting, sorting and storing scraps (which I am nowhere near finished)! The little time I’ve had to sew, mostly in class, has been focused on my braid quilt which has been causing me no end of problems (and will get it’s own post when the top is finally done)!

I really wanted to work on my Canary on a Pinwheel quilt, which is my Relaxing Robin project; but I had no idea where I was going with it. I like to work my way through a project without too much of a plan but with only two nine inch blocks and twelve four inch blocks, the goal of making a 48” x 64” quilt was quite daunting!

For instance: I knew I wanted to make flying geese units to try out the no-waste method (Jennifer Houlden on YouTube; Patchwork Pieces pdf file here) but how big and how many did I need?

I have been inspired to try an asymmetrical quilt since I saw this book last November.

I got really inspired when I found a pdf file on quiltinggallery.com for Gypsy Breeze quilt by Phyllis Dodds. This works because of the limited palette and (I’m assuming) the use of one fabric range.
assymetrical Gypsy-Breeze-Quilt by Phyllis Dobbs on quiltinggallery dot com

It was time to draw up a rough plan. I did one on graph paper, then I duplicated it in Microsoft Paint so that I could try out tones/colours. I don’t know why Paint decided to change many of my lines to red when I tried to colour a block but that's okay – its just a guide!
Canary on a Pinwheel plan Canary on a Pinwheel

You can see how Phyllis Dodd’s’ “Gypsy Breeze” influenced my plan. I, too, intend to use a limited colour palette of clear blue, red, yellow and green – no muddy colours here. The fabrics will mostly be tone-on-tone or semi-solids – I think the idea is busy enough without fussy patterns getting in the way! I’m not sure what my background fabric (shown here in pink) will be; I have to use something that is on hand so I will make the blocks, probably more than I need, first then find a background fabric that works.

And now, dear friends, it’s time to cut and sew some flying geese blocks!
See you with another post on Friday.

Saturday, 8 February 2014

scrap happy

Wow! What a busy week I’ve had. I’ve had at least one activity every day this week, which is most unusual. Next week is also busy with church tomorrow, three activities on Monday and two on Wednesday. Thank goodness I have a free day on Tuesday and on Thursday. There’s nothing in the calendar for Friday but it’s WM’s rostered day off, so who knows? I can’t remember when I was this busy!

However, you didn’t come here to talk about my calendar! You came to read about scraps.
I have been remiss in showing you what I have acquired over the last few months.

First there was a little package from Kate (Kate's quilting blog) in the UK.
 scraps from Kate 2
Then a fellow member of Caring Hearts Community Quilters gave me this little ziplock bag of scraps – all nicely ironed and sorted by size. I have been through the bag searching for pink scraps so it’s been a bit messed up since I received it.
  scraps from Virginia
Then another member of Caring Hearts Community Quilters gave me a large grocery bag of scraps – these are not ironed or sorted so the contents of the bag are a mystery to me!
 scraps from Margaret inside
The next few are not scraps but they have been donated to me in one form or other.

Firstly, I won these two fat quarters of batik fabrics on Lyndsey's blog, Sew Many Yarns. (I’ve just embarrassed myself and found the giveaway was February 2013. Sorry Lyndsey).
fat quarter batiks from Lindsey
One of my class-mates has been de-stashing – I acquired this lovely collection of fabrics on behalf of Caring Hearts Community Quilters. We have no room left in the fabric cupboard in our meeting room so those who receive donations of stash have to store them (or use them) until such time as space become available!
  scraps from Gail
This week, our founder arrived with several boxes and bags of fabric that were left on her doorstep last weekend. My fellow quilters decided I would like to add these fabrics to my Caring Hearts Community Quilters stash – they know I like working with bright colours!
 more brights from CHCQ
Despite my busy week, I found some time for playing with scraps. I pressed and cut these 3.5" tumbler “charms”:
   2014 pink tumblers
I’m still deciding on the final layout; this is not it. Whatever I end up with, this is the first of my scraps this year to be used in the Rainbow Scrap Challenge over at So Scrappy blog.

Speaking of the Rainbow Scrap Challenge; I used up the last sixteen 6” crumb blocks in a panel which will be part of the backing for my “Violet and Friends” quilt.
 V&F backing panel
So, although there hasn’t been time (until now – late Saturday afternoon) to take photos or write a blog post, I have had a little time to sew. It’s amazing what returning to class after a seven-week break does for one’s enthusiasm!

Linking up with the Rainbow Scrap Challenge.
Soscrppy