Showing posts with label workshop. Show all posts

Sunday, 1 March 2015

saying goodbye to pink

It hasn’t been a very productive month, sewing-wise, for me. In the middle of the month, my uncle, who has been researching my paternal family for many years, sent me some information from a distant relative that neither of us has met. At first I only glanced at it, then I decided to read it, then I compared it to the information I had in my family tree. I was hooked! I spent all my days working on my family history – refining and adding. I’m an “all or nothing” kind of gal; when I get involved in something I don’t do it by halves; and so (almost) the rest of month passed without a stitch of sewing!

I did, however, do some knitting! Don’t fall down in shock! Last Saturday, I had to attend a meeting of the local branch of the Knitters’ Guild (I was tutoring on ‘planned pooling’) so knitting was needed! I cast on a sock during the meeting and finished on Friday afternoon. I don’t normally knit during daylight hours but I had dropped a couple of stitches and couldn’t see by the poor light in our living room to pick them up so I had to do it while the sun was shining! And, as luck would have it, the sock is knitted in Moda Vera Noir (a sock yarn) in the colour way “pink mix”!

2015 Sock for Someonr #8


I say “luck” because pink was the colour for this month’s the Rainbow Scrap Challenge. At four o’clock yesterday afternoon, I settled into my sewing room. I had told myself that I would spend an hour cutting and sorting but that just depressed me – after two weeks away from my sewing room (I didn't even attend class last Monday because I had a raging headache) I just wanted to sew. Knowing that it was the last day of ‘pink’, I decided to use my pink crumbs and have some fun. I started out with the intention of making 4.5”  squares and just started sewing crumbs of roughly the same length (on one edge) together. Then I sewed those pairs to other pairs and, in the end, decided I would just sew them together “free-form style” (a knitting term; I guess it’s just a form of crazy patchwork!). I deliberately cut things on strange angles – nothing mattered to me except stitching straight lines (so everything would lay flat at the end) and making sure I had a minimum of a quarter inch seam allowance (some seams are a bit wider wider)!

I finished with a rectangular piece of fabric (15” x 9.5”) that is made up of about 70 pieces of fabric! It will go on the back of a quilt – at least that’s the plan till I suss out the situation in my quilting group: will a truly modern quilt be acceptable? The next piece of ‘crazy’ patchwork will have even more odd angles – the ones I’ve cut here barely show in the finished piece! The bottom right side is looking really good! That’s what I was aiming for!

2015 70 piece jigsaw

So it’s goodbye to pink sewing for now (I will knit the other sock – I don’t like Second Sock Syndrome! Besides, sometimes my tension/gauge changes if I leave too much time between the first and second sock).

Autumn began here today so I’d go for for red, brown, orange or yellow as the colour for March! But Angela, who hosts the challenge, lives in Florida and there’s no chance she’s thinking of Fall now! I’ve just checked…

…it’s yellow!


RSC 15

Are you participating in the Rainbow Scrap Challenge? Even if you’re not, why not pop over to Angela’s blog and see what other’s are up to with their pink scraps.

Thursday, 13 November 2014

photo journal

There has been a lot of this as I continue to take control of my sewing room:
crumb sorting
small containers to hold 'crumbs'  (anything under 2") sorted by colour
scraps in waiting
scraps waiting for my attention

square sorting
moving from open baskets to lidded storage -- this stack is for squares from 2' - 4.5"
 
and some of this in preparation for a workshop (on using coloured and variegated yarns) I am facilitating on Saturday
knitting
two samples of 'stacked pooling'

while listening to this on a continual loop in preparation for a worship service I am leading on Sunday
songlist
and a vast amount of this (we spent most of the last week of WM’s annual leave gardening)
top garden
native hibiscus in foreground, buddleia in middle ground;
clivea and camelia in backgrouns
advanced seedlings
verbena seedlings

seedlings
cosmos seedlings sown five days ago!
 There has been a daily dose of this (can’t resist that view)
deck

and tomorrow is forecast to be 40°C ( 104°F) so there will probably be some of this:
pool

Unfortunately, there never seems to be enough of this:
clock

And, yes, I do know I owe you a post about our time away!

Sunday, 2 February 2014

Something Old, Something New – February edition

If you are visiting this challenge for the first time, welcome;
you can read more about the basic idea on this page
and/or you can click on the link to read the January edition.
Never too hot to Stitch!
Here we are in February. I don’t know about you but January just seemed to fly by. Summer holidays are over (although summer isn’t) – the kids are back in school and most of my activities start up again this week.
I didn’t achieve as much as I hoped during January; the reading bug bit and I spent more time reading than crafting.
One thing I’m already appreciating about the Something Old, Something New challenge is that, because there are only two "set" projects a month, it’s completely doable yet keeps me moving forward.
So, firstly a review of January’s goals:
For the “old” part of the challenge, I aimed to complete a flimsy from 48 crumb blocks I had made for the Rainbow Scrap Challenge in 2011 and 2012. In January, I wrote a post about my process; here’s the flimsy:
V&F finished flimsy
I love it! It turned out much better than it looked like it was going to. Working with other people’s scraps (as I often do) can be a big challenge but this one came together really well.
For the “new” part of Something Old, Something New, I decided to learn how to do shadow (aka illusion) knitting. This is a relatively easy technique which can have spectacular results.

My first attempt was less than spectacular and getting a good photo was more of a challenge than the actual knitting.

Here is what looks like a striped piece of knitting:
shadow knitting #1 stripes
and here is the checkerboard shadow/illusion
shadow knitting #1 revealed
 Pretty amazing, isn’t it?

However, it became very obvious to me when I was about halfway through this piece that smaller needles than usual were required to obtain a good result; otherwise  the areas of stocking stitch (stockinette) are too obvious and break up the illusion in the pattern.

I used 8ply (DK) weight yarn on 4mm needles. Since I have a very loose tension, I need to use smaller needles than that to get gauge at any time – why that didn’t occur to me before starting this sample I don’t know! I’m not teaching this workshop until July, so I have learned something to be sure to tell my students and I still have several months to improve my own technique!

Now, onto February’s challenge:

By the ‘rules’ I set for myself (you can create guidelines that work for you), my “old” project has to be something I have not worked on in more than three months.
on the bed - too big
I began my Country Houses quilt in 2011 and worked on it through the year.  I originally intended it for a single (twin) bed but it’s much too big for that so I’ve been trying to make it fit my queen size bed (which is where it was photographed and you can see it’s way too long and too narrow -- two rows have since been removed). It occurred to me recently that I could just turn it into a wall hanging and hang it opposite the front door. Now I’m not sure what I want to do with it but I know I want to get it out of my UFO pile!

Therefore my “old” project will be to take Country Houses at least to binding stage!

My “new” challenge will begin in the class I attend at my LQS: we decided last year that we would be working on the technique of foundation (paper) piecing. Because I have not done any, I have nothing to show you of my own but I’d like to try this block designed by my friend, Cindy, at Tops to Treasures. The link is to Cindy’s tutorial for making this block.
Paper Pieced Tree Image
So how about you?
Did you work on an old project in January and/or learn a new technique?
Do you have an old project you will be working on in February?
Will you be learning a new technique in your chosen craft or starting a new project?

Link here with the URL of your blog post so we can all visit and see how you went in January and what you have planned for February.

Wednesday, 23 January 2013

double knitting workshop

On Saturday, I tutored a two-stranded double knitting workshop for the Blue Mountains group of the Knitters’ Guild of NSW.

Double knitting can mean one of three things:
  1. a term for the weight of yarn; in US it’s called DK (double knitting), here in Australia we call the same weight 8ply
  2. using two yarns together to knit is sometimes, incorrectly, called double knitting
  3. a technique whereby a two-sided fabric is produced
It is the latter technique which was the subject of my workshop.

This is the sample I designed and knitted in DK pure wool (unblocked); the participants were given this pattern in the workshop. The finished size is 10.5cm x 12cm (4” x 4.5”) so it could be used as a coaster.
2013 double knitted coaster light ground2013 double knitted coaster dark ground

Below are the other samples I have knitted. The first is also in DK wool. I can only take credit for the knitting of this one; it was designed by Elizabeth Evans (Ravelry link). Ravelry tells me that I knitted this back in 2010.
2010 double knit teapot potholder blue on beige
The other side is a beige teapot on a blue background.

The second sample was designed by Laura Ponce de León as the Cubic Scarf (Ravelry link) but I felt it was too thick to wear as a scarf here in Australia. Perhaps in climates where it gets very cold, one could wear it as a scarf. Also my knitting created a very dense fabric which didn’t have the drape I prefer for a scarf. I intended it to be a bib for Older Grandson (who had not yet been born when I started it in 2010) but being 4ply (fingering) acrylic it had zero absorbency, something I soon realised was needed in a bib!
2010 double knitting scarf bib
I also showed the workshop participants this teeny pincushion/needle-holder I knitted as a prototype in December 2012. It is knitted in the double knitting technique but in a single strand of sock weight yarn on 2.00mm (US 0) needles.
  2012 mini double knitted pin cushion
I am thinking I will make a bunch of these (perhaps a little bit bigger) for my classmates Christmas gifts in 2013. Don’t be fooled by the size of the photo. That is a Size 8 embroidery needle.This one is a perfect size (4cm – 1.5”) to fit into my embroidery kit which is contained in this cute little tin, which itself is about 10cm x 6cm (4” x 2.5”).
Guterman tin
Now I’m hooked on the possibilities of double knitting – a reversible hat, a bag, and a drapey scarf.

Would it be possible to do it in entrelac?
What  about lace? The decreases may be an issue!

So many ideas – so little time! So many UFOs/WiPs to complete!


Wednesday, 19 September 2012

still a bag lady!

Last week I showed you a small rectangle of linen stitch which was my preparation for a workshop held last Saturday at my local knitters’ guild.

The workshop was very well prepared and presented and obviously very inspiring since that little rectangle has now become this:
2012 rainbow market bag
A fast and easy knit. I think the most tedious part was the linen stitch handle. I foresee some more of these in my future.

The bag even has my very first i-cord closure:
2012 rainbow market bag detail
Thanks WM for modelling!

Friday, 15 June 2012

I have not been well

Last Saturday, DD and the Grandsons visited. Both the boys had runny noses, Older Grandson was more obviously sick than Younger Grandson. But that didn’t stop him from getting into his usual mischief (he’s a two year old, very active boy). He was, however, more sooky than usual.

On Sunday night, I didn’t sleep well. My nose kept blocking and I couldn’t stop sneezing. On Monday I blew my nose all day long. By Monday night the cold had infected my sinuses and I thought I had partially inflated balloons inside my face!

As a consequence, not a great deal of anything has gone on here. A lot of time in front of the computer or the television. And a fair amount of time in bed – some of it sleeping, some of it tossing and turning!

During the week I missed two of my favourite monthly activities: a full-body massage and an embroidery class! Sad smile

I have watched a lot of television, including the movie Finding Neverland, which I recorded when it was on during the day a couple of weeks ago. I have never seen the movie and really enjoyed it. I think Johnny Depp gave a sensitive, understated performance (unlike his characters in Pirates of the Caribbean, Charlie and the Chocolate Factory or Alice in Wonderland where he is completely over the top!). I don’t think I would watch the movie again for a very long time, if at all, because the magic of it would be lost in having seen it before.

I have done some reading – mostly of knitting reference books or quilting magazines. Last night I began Mao’s Last Dancer. I have not seen the movie and have only read the first two chapters so it’s a bit early to know what I think, although I have to say I really enjoyed the author’s description of his mother’s feelings on her wedding day.

I have snooped around Ravelry and added a couple of real life friends to my Ravelry friends! How extraordinary that they weren't already there – sorry R. and S. I discovered recently that I enjoy reading the notes my friends leave on their project pages – am I too weird?

I have done some knitting almost exclusively on a blanket which I will donate to a local animal shelter. I don't think the yarn is suitable (in colour or texture) for anything else. The yarn is Patons Cedar long discontinued, a pure wool boucle yarn that has no indication on the ball band as to needle size. I contacted a seller on Ebay who had a 1972 pattern for sale (thanks putney32); she says the patterns are knitted on 3.75mm (US 5)  needles which I find quite surprising as it is much thicker than DK yarn due to it's bouclé texture. I am knitting on 4.5mm (US 7) needles and it still gives a rather dense fabric, which is okay for blankets but a bit stiff for a jumper (sweater).
  2012 animal blankie #1 close up2011 Cedar yellow orange
I estimate I have about four hours of knitting left to finish the blanket which will be about a metre (40”) square.
2012 animal blankie #1
Tomorrow I am the tutor for an all-day workshop on knitting socks from the toe up. I was to have given this workshop last September but I was sick and it was postponed. I thought the tutorial notes was ready to go but on Wednesday I decided to completely re-write them for people who prefer stitch by stitch instructions – a most welcome suggestion from D. who reminded me that people would take the notes home but may not look at them for days, weeks or even months! So I have not written a pattern per se, I have written step-by-step notes, a tutorial in words.

I have also added notes for every row of the heel on how many stitches there should be on each needle so that participants will know immediately if they have gone wrong and ask for help then and there! When they are at home, they will only need to correct that row (assuming that they checked their stitch count at the end of the previous row).

The tutorial notes come to fourteen pages – I have written them for people working on 5 dpns, 4 dpns, two circulars or one circular. There are two appendices: one for the cast on and one for the bind off, both being used with permission from their original authors.

Apart from re-writing the notes and emailing back and forth with my two test-knitters/assistants (thanks C. and D.), I have test-knitted a sock using each of the four methods. Top row (left to right): 5dpns, 4dpns; bottom row: 2 circulars, one circular.
2012 socks from the toe up workshop samples
Do you know it is really hard to test-knit a pattern? One has to forget what one knows or assumes to be right and actually read the instructions! Who’d a thunk it?

Wednesday, 26 October 2011

eek! a steek!

Last Saturday, the Blue Mountains group of the Knitters' Guild of NSW held a steeking workshop. DD and I arrived very late but I caught the end of the workshop. Our guest tutor, Mary-Helen, was very gracious and showed me how to steek the tube I had prepared in advance.

Step 1
Knit your garment (or, in this case, a small tube 10cm - 4" - high)

Step 2
Using a hook a couple of sizes smaller than the needles used to knit the item and a contrasting yarn, crochet a column of stitches three stitches away from where the steek will be -- on both sides of the steek.

Step 3
Take a deep breath and remember to keep breathing! Cut the column of stitches along your steeking line.
It's all very well to be "gung-ho" about cutting a sample tube. I'm sure it would be quite a different matter to cut into a garment on which one had worked for many hours!

But at least I know how to do it and that can only be a good thing!

Saturday, 8 October 2011

a brief summary of Camp

I arrived at the Knitters' Guild of NSW (Inc) Camp on Friday evening at 5:20, after an almost three hour trip - half an hour of which I spent travelling just four kilometres (2.5 miles). A police operation was underway in Castle Hill (a motorist been shot by the police the day before) so there were major roads closed in the area.

I was given a nice twin bed motel-style room with en-suite which I shared with a member of my own knitting group so the accommodation was much better than I was expecting. The word "camp" conjures up bunk beds and dormitory style rooms so it was a very pleasant surprise. The food was quite good and there seemed to be enough for everybody although those at the end of the queue missed out on pumpkin for dinner one night.

I took my camera, charged the batteries overnight and then was too busy to take any photos!

On Saturday I tutored an all day workshop on entrelac knitting. I am by no means an expert but I have knitted quite a few blankets in garter stitch entrelac so I am very familiar with the technique.

All the samples I prepared were knitted in acrylic (I don't like "wasting" wool for knitting samples and I hope they'll be protected from insect attack!) and unblocked: I wanted the participants to see what their work would look like on the needles - which is not always like a blocked piece; this is especially true of entrelac.

In the first session of the day, I taught the participants how the squares of entrelac are joined together. We worked in garter stitch: but some of those squares were knitted entirely in purl. The samples show the same square knitted in one handpainted yarn and in two contrasting yarns. The participants all made the sample with two yarns so that hey could see how it comes togehter.


After lunch came the harder session: not only did the participants learn how to knit traditional entrelac in stocking stitch, which meant making triangles at the base, sides and top of their sample, but I also taught them to knit backwards and asked them, if they could, to knit with the right side facing for the rest of the day. Knitting backwards is knitting the work from the right needle to the left needle; this saves turning the work around at the end of every eight stitch row which, with practice, is actually faster than knitting and purling.

Most of the participants got it and were happy to keep knitting that way (slowly) for the remainder of the afternoon. Some of them said they really enjoyed knitting backwards, which was a real bonus!

The sample shows the difference in size and finish knitting the same pattern in stocking stitch versus garter stitch - same needles, same yarn, same number of stitches, same knitter.


For the fast finishers, there was a bonus sample: lace entrelac. Well, a combination of lace and garter stitch as seen below.

I was given many thanks and compliments for the workshop which I really appreciated.

On Sunday I was exhausted. 8:30am-5:50pm was a long, long day for me! The weather was miserable, and got worse as the weekend progressed. I had planned to leave on Sunday afternoon after the intarsia workshop I was taking, but the combination of heavy rain and fatigue made me decide to leave at lunch time on Sunday.

I had a good drive home, despite the heavy rain at the beginning of the trip, and was home in about two and half hours. It was the first time in a very long while since I had driven that kind of distance (170km - 106.5 miles - each way) so I was quite pleased with myself.

I had a wonderful time (despite the weather and the exhaustion) and would encourage Guild members to start saving now for Camp 2013. And be sure to let the Committee know what workshops you would like to see at the next camp.

Wednesday, 7 September 2011

preparing for a toe up sock workshop

On Saturday 17th September, I am tutoring a workshop on knitting socks from the toe up. I am being assisted by two very experienced sock knitters, one of whom only knits toe up.

We will be using Judy's Magic Cast On (pending permission), some short-row shaping in the form of an hourglass heel from The Twisted Sisters Sock Workbook by Lynne Vogel (2002) - used with permission - and finishing with Jeny's Surprisingly Stretch Bind Off (also used with permission).

I have written the pattern for our sample sock. I have test knitted the pattern for 5 dpns, 4 dpns and two circulars. I have asked one of my assistants to translate the dpn instructions for Magic Loop (I hope it's not too complicated) and have asked the other one to re-test the instructions for 5dpns.

Here is my sample sock. Cute, huh?
What do you mean, you can't tell what size it is? LOL
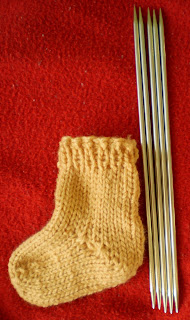
Here it is again - those are my 20cm (8") Knitpick dpns added for scale!

This sock is a little too small - it is knitted on 24 stitches on 3.75mm (US 5) needles using 8ply (DK) yarn. I have re-written the pattern for 32 stitches; that will mean more practice on the short row heel, which can only be a good thing, right?

Thursday, 21 July 2011

getting to know your machine

It's been a little over three weeks since Jan came to live with me.

Last night, I had the first of my two "getting to know your machine" classes.

First, we were told about needles and threads. Ball point needles separate the threads and go between them, sharp needles just piece the threads. Did you know that it is the sharp needle pushing through your fabric, splitting the warp and weft threads that causes all that lint inside your machine?

Did you know quilters use cotton thread because it has no give? Quilts don't need to give at the seams like clothes do, which is why garments are generally sewn with polyester thread. And rayon thread is used for decorative stitches.

We were shown how to wind a bobbin and insert a bobbin correctly. All nine participants had top loading bobbins, so that made it easier for the teacher. In fact, seven of the nine participants had Janome machines (the other two were Husqvarna).

We were shown how to thread a machine and then we had to wind our own bobbins and thread our own machines. We were then encouraged to try out the stitches on our machines while the teacher came around and explained the various features of each individual machine to its owner!

After some time spent playing with stitches, the various types of foot and their purposes were explained. We were then shown how to sew a buttonhole which we had to follow up with a button hole of our own. How easy they are these days; a far cry from the four step process of my old machine!


Finally we were shown how to blind hem. Since there is little call for blind hemming on my quilts, I asked the teacher if she would show me how to attach the free motion foot correctly. I have broken one needle in three weeks (actually it was in the first forty-eight hours) by incorrectly attaching this foot.

So, while the other participants sewed blind hems - should that be blindly sewed hems? (LOL) - let's try:

So while the other participants practised sewing hems using a blind hemming stitch, I practised sewing free motion circles (not as easy as it sounds) and attempted to free motion quilt my name.


I think more practice is needed!!

Next "getting to know your machine" class - 21st September, in which I learn to use the "memory" on my machine.

Saturday, 16 July 2011

an old jumper

I knitted this jumper (sweater) back in the dark ages, before I had a blog. I finished it in 2003 and I think I worked on it (on and off) for about three years.

taken in artificial light but reasonably true to colour
It was inspired by Kaffe Fassett but is not one of his designs - it's one of my own. The theory is the diagonal patches of light colour would cause the eye to travel up or down rather than across as horizontal stripes would. I wanted something more interesting than stripes anyway!

I'm proud of this jumper but I don't love it. It's very thick and heavy; it's made mostly from 8ply (DK) weight yarn - with some 5ply (sportweight) and some 12 ply (chunky). It's mostly wool with a little bit of mohair.

I don't wear it very often - whenever I do, someone always wants to talk to me about it - it's not a jumper I can wear when I want to be "invisible"!

Now that I've seen the photos - it looks more like a man's jumper, doesn't it?


Today it formed the centrepiece of a workshop I gave on "colour theory for knitters". How did it go? I felt it went okay but it fell a bit flat! But you'd have to ask the participants for the real story, wouldn't you?


Can you guess how many different yarns are in the jumper?

Monday, 30 May 2011

mobius wrap

Last July, DD and I attended a one-day workshop hosted by the Blue Mountains group of the Knitters' Guild of NSW. The tutor was Jude Skeers.

Before lunch we made sample mobius wraps in order to learn all the skills necessary to complete a full sized wrap; after lunch we worked on the "real thing".

I finished my wrap about two weeks later, but only got around to photographing this weekend before sending it off with the other 509 items to Australian Inland Mission.

I used the only yarn I had in my stash that fitted the description of the yarns we were asked to bring. I don't like mohair and was pleased to finish the wrap. I also don't think that orange and purple is a great colour combination - but other people have loved it!

I chose to knit the curved back (the alternative was a point) which turned out quite well.


The stripes work better on the front and the mobius twist adds that little bit of glamour to what otherwise would be a knitted tube.
Under the tee-shirt is an unscheduled appearance of GB#2, due 8th July!