Showing posts with label acrylic yarn. Show all posts

Thursday, 17 July 2014

How much yarn is too much?

Warning: all about yarn (no fabric here sorry!)

The week before last I assembled all my yarn in one place.

I didn’t intend for it to be there for long. Things happened (a story for another post) and I was just too exhausted in the evenings to do anything! By the time I updated my  records on Ravelry, it took me most of a week! However, I was able to look at the whole lot realistically and make some decisions about what to keep and what to give away!

To tell the truth, at first I was overwhelmed by the amount of yarn I had. However, the longer it sat in front of me, the more used to it I became and now it doesn’t seem so bad!

So we’ll begin with what I had before the cull!

The synthetic yarns were mostly on the table. Here is the view from the end of the table closest to my knitting chair

  2014 synthetics 2

and here are the synthetics (including baby yarn) again from the side of the table (yes, that is my fruit bowl lost in there!)

 2014 synthetics

That's a lot less synthetic than there used to be but still way too much for my liking!

On the floor, under the end of the table were the cottons and bamboos, with the sock yarns to their right

 2014 mostly socks

I discovered that I could knit a pair of socks each week for a year and not run out of yarn (I had no idea I had so much)!

Finally, in front of the television unit, are the wools, including UFO’s in that white box.

2014 wools with sock yarn on the side

One thing this exercise has reinforced is that my stash is mostly either 8ply (DK) or sock yarn. No wonder I never get around to knitting all those lightweight projects I have queued!

And, because we all need closure, here is my yarn collection now. Now I just need to find a permanent home for those nine 28 litre (7.4 gallons) tubs (left to right, top to bottom: baby yarn, two tubs of sock yarn, yarn for me, cotton and cotton blends, wool in weights other than 8ply/DK, UFOs for me, sock yarn for me, acrylic 5ply/sport-weight). The two large ones, which have a capacity of 80 litres each (21 gallons) live under the spare bed. The bottom one holds my 8ply/DK wool yarn, the other is full of 8ply acrylic!

2014 collection minus grab bags

This collection of tubs does not include my stash in “grab bags”; some of which are seen in this photo. These are housed in a drawer under the spare single/twin bed.
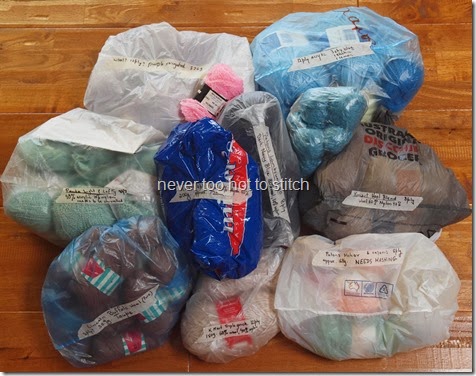
labelled grab bags

I did not take a photo of the yarn I gave away – that didn’t even occur to me, sorry.

Now that the yarn is sorted, I can get back to some stitching! Of course, there’ll be some music in the background while I sew or some television viewing while I knit.

What do you like to watch (or listen to) while you’re stitching?

Friday, 9 November 2012

adding to the stash (again)

I’m still on a yarn and stash diet. I haven’t fallen off the wagon. My rule was that I could buy any yarn or fabric as long as it had a specific (short term) purpose. There should be no adding to the stash just because I love something, or because it’s on sale.

I have not broken the rules with my most recent purchases.

Firstly, there was this fabric for my niece’s baby’s play quilt. All except the solid are from The Very Hungry Caterpillar range of fabrics.
2012 top completed2012 VHCaterpillar all over detail
The left photo is a glimpse of the top which I have finished and the right is the backing fabric (to be used in conjunction with the spots and solid).

The green in this photo is the backing and sashing fabric I have chosen to go with my Christmas Tree embroideries and the waves fabric is to be the backing for a cushion/pillow which I’m making as a gift.
2012 gree for Christmas, waves, VHCaterpillar all over
I won these two sweet Japanese fabrics in a give-away on Val’s blog.
2012 Japanese fabrics from Val's giveaway
Val also included this little handbag charm – how cute! I didn’t see it until I went to take the photos today so a special thank you, Val, and please forgive me for not mentioning it in my email to you.
2012 handbag charm from Val's giveaway
Carol, at FunThreads, sent me this little package of fabric for the I Spy quilt I plan to make for my grandsons. Thank you so much, Carol. It was very kind of you.
2012 fabric package from Carol
This is Older Grandson’s favourite fabric square.
2012 Thomas square from Carol
I’d better move that I Spy quilt up the “to do” list, I think!

As for the yarn, I have purchased only two 100g skeins.
2012 Moda Vera Marvel x2
Yes, I know it’s acrylic and I said I wasn’t buying any more acrylic but I have a bag full of acrylic yarn to use up and a great idea in mind, so I purchased these two because they were on sale and because they were colours I didn’t already have in my collection.

I didn't buy this yarn but it is now in my stash. It is 100g of Crazy Zauberball – a yarn for making matching socks becasue two strands of yarn are placed alongside each other and dyed together -- giving a perfect match!
2012 Crazy Zauberball
This was the prize for the most popular item in the One Skein Challenge at our knitters’ guild meeting last month. Thanks to all the members who voted for my Extended Swallowtail Shawl.

Time to get back to those WIPs  that I mentioned in my last post! One is now finished so there should be a celebratory post soon!

Sunday, 9 September 2012

identified finished object

Some garter stitch, a set of 5mm (US 8) circulars and 200g of Moda Vera Noemi, colourway “red” plus nine days of knitting have produced this:
2012 Shawl for Someone #3
An easy knit and a satisfactory finish.

And that’s two more skeins of acrylic yarn gone from my stash! Hurrah!

Ravelry tells me I have 60+ skeins of acrylic to go – but some of them are being used in the acrylic intarsia blanket – Ravelry just doesn’t know it yet!

Now back to the intarsia blanket before the weather gets too warm for knitting afghans!

Thursday, 23 August 2012

a finish and two WIPs – all knitting

I mentioned in my last post that I had started a new project, even though I had determined back at the beginning of July that there were to be no more new projects until I turned some of my WIPS into FOs. But I needed to purchase some yarn (as mentioned in my last post) to keep working on my Intarsia Blanket. My other UFOs involved stranded colourwork techniques, or working with sock yarn and small needles, neither of which I felt like doing. So I cast on a simple garter stitch shawl in 10ply (worsted weight) bouclé acrylic yarn on 5mm (US 8) needles. This was my progress on Wednesday afternoon.
2012 Shawl for Someone #3 day 3
As for the Finished Object -- I showed this cowl at the Knitters’ Guild meeting on Saturday. I actually finished knitting it on 24 July but the cast off was too tight so I unpicked it and redid it (a few days later). I finally got around to sewing the ends in at The Guild meeting, just before Show and Tell (one of my favourite parts of the meeting). The photo on the right, which shows the detail of the stitching, is more like the real colour.
2012 Cynthia Brown Cowl2012 Cynthis Brown cowl detail
The pattern is Cowl de Printemps by Jeni Chase (Ravelry link). The yarn is a sadly discontinued tencel/acrylic blend which is oh-so-soft, perfect for items that will be worn around the neck.

During the Guild meeting, I worked on the Never-ending Intarsia Blanket I started in November last year. It has been knitted on and off, depending on the weather and my mood – each row takes me twenty minutes to knit, that’s an average of just eleven stitches a minute, which is slow for me, but I have to stop to add a new colour at least once (and usually more) each row, plus weave the ends in. Some rows are faster than others, but twenty minutes is average!

When I last showed you the blanket at the beginning of July, it looked like this.
2012 intarsia blanket 6 July
I had added another fifteen rows after this photo was taken but hadn’t taken another photo. Since writing that report on 7th July, I have added a further 206 rows (41,200 stitches) for a total of 414 rows; only 286 rows (or 57,200 stitches) for my target of 700 rows.

Anyway, enough of the statistics, the blanket now looks like this:
2012 Intarsia Blanket 414 rows
As you can see, I really did need to get some more red in there!

It’s the kind of knitting that gets people’s attention, even at a Guild meeting!

Tuesday, 21 August 2012

some yarn purchased and a new tool

I have passed the halfway mark with my intarsia blanket (more on that in a forthcoming post). Unfortunately, although I planned to use up odds and ends of acrylic yarn accumulated from other projects, I have found that I need to keep buying acrylic yarn.

Sad smileI have discovered that I would rather not knit with acrylic so I am hoping to my diminish my supply rather than keep adding to it!

Anyway, back in March I purchased 5 balls and hoped that would be enough.
2012 Needles blue gold variegated2012 Needles fluoro yellow2012 Needles hot pink
2012 Needles soft green2012 Needles cool variegated
But I’m a bit of Kaffe Fassett fan: “if in doubt, add more colour”. As my scraps have run out, I have been “forced” to buy more yarn. in the last few weeks I have added these yarns to my stash. They are all acrylic; the Needles brand (the first five skeins) is softer and cheaper than the Thorobred but I couldn't get all the colours I needed in the Needles brand.
2012 Needles 8ply green variegated2012 Needles 8ply grey2012 Needles 8ply pink red blue yellow2012 Needles 8ply dusty pink
2012 Needles 8ply red yellow blue black2012 Thorobred 8ply Red2012 Thorobred 8ply light blue2012 Thorobred 8ply  bottle green
This has not affected my stash-busting policy for this year; because there was always a “get out of jail free” card –> No yarn (or fabric) is to be purchased and added to the stash in 2012, unless it is needed for a specific project”.

All, except the last three of these yarns are already in use in the intarsia blanket. I stopped knitting yesterday and started another project (oh no!*) because I really wanted to put red where I needed a new colour. the blue and the green will also be used in the next row or two so they were bought specifically for this project.

While I was in the Big Box Store this morning, I also bought myself one of these:
2012 chest magnifying glass
I hope it helps me see the placement of the cream stitches on the white Aida 14 count cloth!

*I had decided I wasn't starting any new projects until I finished some UFOs but I was only in the mood for garter stitch, so a new project was started.

Saturday, 15 October 2011

a warning to my knitting friends

We all know acrylic is a bi-product of the petroleum industry; that is: a form of spun and plied plastic. It melts when heated and become brittle when frozen.

And insects don't eat plastic, right?

Well then, can anyone explain these?


Which came from this?


The only explanation we can come up with is that Younger Grandson threw up on my knitting (which was packed away in a bag near where DD was feeding). DD cleaned it up but left a protein residue which was attractive to whatever chewing insect did this!

Moral of the story - make sure you wash you hands after handling food or other protein products (including some hand creams). If you spill something on your knitting, fix the stitches somehow and properly wash the knitting.

Otherwise you might find yourself ripping out hours of work (in my case 96 rows -- 18,720 stitches!)

Sunday, 24 July 2011

a note to the Cruise Director

ETA: progress on my to do list is at the bottom of the post!

One of the followers of this blog has self-styled herself as the "Cruise Director" (hi, C!)

In the interests of keeping the ship afloat (so to speak), I bring my latest report on the progress of the Pinwheel Blanket.

The finished blanket will have 112 units (5" x 5") joined together to make 28 blocks (10" x 10").

So far I have joined 80 of those units into 20 blocks.

I then joined those 20 blocks into 10 pairs of blocks.

Four pairs are joined together to make a group of eight (seen on the left of the photo below) and six pairs are joined to make a group of twelve but the twenty blocks (8 + 12) have not yet been united.


Before I ran out of yarn, this was the pile of units I had knitted.


Because there is a mistake in the joining of two blocks in the photo above, and because I would have to rip out 200cm (80 inches) of grafting to fix the mistake, I have decided to let sleeping dogs lie. (Are sleeping dogs allowed to lie around on this ship, Cruise Director?)

The good news is that having made that mistake, I can now make a deliberate mistake and fudge one more block for the yarn I couldn't get!

So now I have to do the following to be finished by next Sunday:
  • finish knitting two units which were started but couldn't be completed because of the absence of purple yarn (done - Sunday 24th July)
  • join 28 units into seven blocks (done - Sunday 24th July)
  • layout the units to see which two colours will work best for my fudge block (done - Sunday 24th July)
  • knit four units for the fudge block (done - Sunday 24th July)
  • join those four units to make one more block (done - Sunday 24th July)
  • join the last eight units into four pairs (done - Sunday 24th July)
  • join the four pairs into one large group of eight (done - Sunday 24th July)
  • join the group of eight to the other group of eight to make a group of sixteen (done - Monday 25th July)
  • join the group of sixteen to the group of twelve (done - Monday 25th July)
  • sew in all the remaining ends (started - Monday 25th July; finished Wednesday 27th July)
  • crochet a border around the blanket to finish the edges neatly (started - Tuesday 26th July; finished Wednesday 27th July)
Do you think I can do it?

Saturday, 9 July 2011

Can acrylic be blocked?
(a tutorial of sorts)

The short answer is "yes" but not in the same way as natural fibres.

Natural fibres are generally "wet" blocked. For some people, this means spraying their finished knitting and gently stretching easing it to the correct size. For others, blocking means thoroughly wetting the item, removing some of the excess water and then pinning it and easing it to the desired size and shape.

Acrylic is designed to be washed in the machine and (sometimes) tumble dried and still retain its shape! Therefore wetting it to block it and expecting it to retain its new shape is futile. It will just think it's getting a bath and retain its original shape when dry.

Acrylic is a form of plastic. It is created and moulded into various shapes under heat. Have you ever accidentally put a plastic container near a heat source and have it melt on you? Heat will change the shape of acrylic and after it cools it will forever hold that shape.

Acrylic yarn is simply plastic fibres spun together. Heated, they can be moulded to take on new shapes (Ooo, this sentence gives me an idea). But if you bring acrylic yarn into contact with a heat source, the yarn will melt.

So, what heat source do most of us have that will not melt acrylic fibres?

Steam!

There are, of course, several ways to create steam but for me the easiest way to block acrylic is with my steam iron.

Here is my process:

1. Fill the iron with as much water as it can contain and put it on maximum heat and steam.

2. Pin your item to the size and shape you want. In my case, it was a 25cm (10 inch) square. Pin the corners first


...then the centres of each of the sides. Make sure the centre is in the middle - in this case 12.5cm (5 inches).


Press it gently with your hands to get the shape you want and ensure that it is flat.

3. Hold the iron about 2 centimetres (approximately three quarters of an inch) from the item for about 10 seconds then move the iron to another part of the item and steam there for ten seconds, etc. I hold the iron at an angle because I have discovered that a) steam is hot and it hurts and b) steam goes straight up so if I hold the iron at an angle my hand is protected!

 I go all over the item again a second time, just to be sure. For my 10 inch square that meant 10 seconds at the top (horizontally), 10 seconds across the centre (horizontally) and 10 seconds at the bottom (horizontall) followed by 10 seconds on the left then 10 second down the centre then 10 seconds on the right (one minute of steaming) - then repeat all that again (two minutes of steaming).

Do not let the iron touch the knitting - the acrylic will melt on your iron and, besides making an awful mess on your iron and ironing board cover, it smells terrible! (no, I haven't tried it but I did once burn acrylic while dyeing in the microwave - I left a metal paper clip attached!!)

4. Let the item cool before removing it from your blocking surface (I pin straight into my ironing board).

So, here is one of my pinwheel blocks - unblocked.

And here it is after blocking (notice there are no pins holding it in shape).

Does it retain its shape after blocking? Well, let's find out.

Here is the square scrunched up after blocking.
Here is the square un-scrunched.
Neat, huh?

Come back tomorrow to see what happened to these blocks next!

Monday, 23 May 2011

ennui - over and out
Part 1

I've found a way to get over my boredom with my current projects...

Finish them!

There is nothing deep and meaningful about this - simply a decision to "just do it"!

On Saturday night I put some of my favourite music on my iPod, put the iPod in the docking station and bit the bullet by sewing in the last 100 or so ends of my Fibonacci Strip blanket.


While doing so, I noticed that one of the patches had a dropped stitch. On closer inspection the stitch had somehow been broken or cut (it's acrylic so I doubt it was insect damage). I unravelled a row, picking up stitches top and bottom as I went, then tightened some stitches so that I had an end long enough to weave in, and sewed that end in.

With the long end that I had unravelled, I grafted the two rows back together again. Thankfully, it was a variegated yarn (one of my hand-dyes) so my wonky garter stitch grafting doesn't show up too badly!

Here, for your viewing pleasure, is the entire Fibonacci strip blanket.


The blanket was knitted in strips 20 stitches wide, with the length of each patch determined by the Fibonacci series of numbers: 1, 2, 3, 5, 8. For this blanket, 1 was equivalent to four rows.

When the strip was the correct length, I picked up stitches (with the purple yarn) along the side of the strip and cast on an extra twenty stitches (in a different colour) to begin the second strip. As I knitted each right side row, I knitted the last of the twenty stitches together with one of the picked up stitches along the edge of the previous strip (a technique from entrelac) - no sewing for this knitter!

After all eight strips were completed, I picked up stitches along both long sides and knitted borders, then picked up stitches from the top and bottom and knitted borders. If I hadn't told you, you might think I knitted the border in the round but I didn't, it only looks like it!

The only downside to my favourite theme in knitting - colour, colour, and more colour - is all the ends to be sewn in! Yes, I could weave them in as I go but ... well, you know how it is! Sometimes sewing ends in can be therapeutic!

Come back tomorrow for my other "boredom breaking" secret!

Sunday, 22 May 2011

hat trick

Cricket was a game that my dad loved and played well into middle age.

In cricket, a hat trick is awarded to the bowler when three batsmen are bowled or caught out from that bowler's three consecutive deliveries. Not easy to do, as you can imagine.

The term "hat trick", according to Wikipedia - the source of not always accurate information - was first used in cricket in 1878, and is now used in other sports, as diverse as soccer, lacrosse, hockey, motor racing, darts and poker!

If I had been raised in a "betting" family, I may have called my post Trifecta, so I guess by now you know that three is the essential number here! LOL

I completed three hats (we call them beanies) in three consecutive days so may I present my hat trick?

All three are variations of my "go to" pattern, which is labelled Beanie With Pompoms in Handknits to Wrap and Adorn (Ravelry link). Mine definitely do not have pompoms (nor are ever likely to!)

The first is Self Striping Beanie, which is knitted from 8ply (DK) acrylic which I hand-dyed using acid dyes. Here is the yarn in the round, so to speak,


and here is the beanie:


I love the process and products of hand dyeing but am a bit over the self striping or blotchy "pooling" effects of these yarns. This second hat, my Not So Subtle Stripes beanie, uses the left overs of the above yarn paired with a solid acrylic of unknown origin. I like the way this breaks up the pooling.


You know, it's astonishing how plastic-y acrylic feels when I have been knitting in wool for several weeks! I guess that's because it is a form of plastic!

The third beanie is my favourite of the three. It was actually the first of these three beanies to be finished but I'm one of those people who likes to leave the best till last.

I call it my Subtle Stripes beanie. It is knitted in the remainder of the variegated yarn used for my Water, Forest and Fire scarf (Ravelry link to my project page) with a ball of Moda Vera Pure wool, colour Fern.


I love the way the stripes work in this beanie and will definitely repeat this idea.

Now I understand why so many beanies turn up in the charity parcels - they are so quick and easy to knit! There's no need to repeat one to create a second one (as is the case for socks/mittens/gloves), and no boring repetitiveness (as in scarves) because they are done so quickly. In many cases, a 50g skein is enough to complete a hat so three or four hats can be made from the same amount of yarn taht is used to make one scarf.

Long live the hat - may many heads be warmed!