Showing posts with label quilt-as-you-go. Show all posts

Thursday, 23 July 2015

there is work in progress

At Easter, DD and the family came to visit – it was so good to be able to spend time with them again; especially since DD and I got to spend some time together in the sewing room. Older Grandson helped to sort scraps and it wasn't long until he wanted to sew too. He loved sitting on my lap and feeding fabric in to the machine that was running on the slowest speed possible. At the end of the weekend, we had nineteen scrappy quarter-log cabin blocks of varying sizes made (they weren’t square and ranged in size from 9” to 11.5”). Unfortunately, I didn’t thing to take photos of the blocks that we made but I do have some photos of Older Grandson hard at work!
 2015-04-03 Ben sews on machine 2 2015-04-03 Ben sews on the machine 2015-04-03 Ben irons

In May, it was announced at our quilting group that there was going to be a log cabin challenge for all of us to use up scraps! Seems like I was already ahead of the game! LOL

I searched the internet for inspiration – I had absolutely no idea how to put those blocks together given their different sizes and shapes. But sometimes, I just have to be patient and let ideas percolate. In the end I decided to go with a wonky setting but I still had no idea how to go about it. I started looking at tutorials, but all the ones I found were for making sashing on all four sides of he block. I wanted to add sashing on only two sides. In the end, I found my own away to do it – the wider you cut the sashing and the more fabric you are prepared to ‘waste’, the better this works. Again, it didn’t occur to me to take photos of my work in progress – you can see how out of the habit of preparing for blog posts I have become!

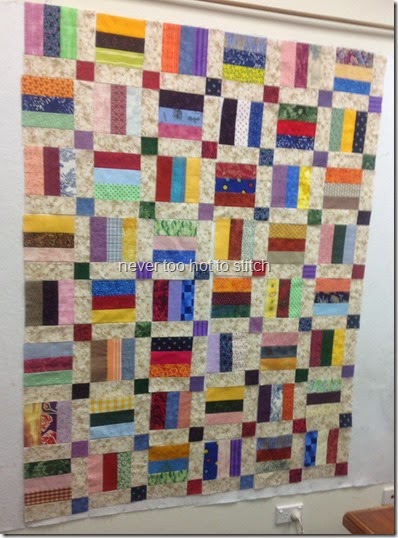
Armed with twenty blocks (I made the extra one), I headed to class at my LQS. They have a design wall – I do not! My teacher, who loves traditional patterns and Civil War fabrics, is quite bemused by me sometimes, I think! Here I was with a totally radical modern approach to quilt blocks and I hadn’t even consulted a pattern! I did take a photo of my layout on the design wall but have since deleted in from my iPad – because I’ve finished the quilt top. Here it is for your enjoyment:
 finished front

I have also finished the backing.
finished back

The fabric used for the sashing and the backing is Saffron Craig’s Ginkgo Blossoms (c.2009). I used about three and half metres to make this quilt which will finish at 52” x 64” and is made up of twenty 12” blocks plus extra sashing down one side and across the bottom.
This one is basted and in the process of being quilted.

While I was on a roll, I made the backing for another quilt which I had finished in October last year.
on design wall

It is made from ‘Disappearing Nine Patch’ blocks with one modification – I made the neutral pieces of the nine patch smaller than the coloured parts; thus giving a thinner sashing than would otherwise be seen.
ready to cut and disappear

Here is the finished backing, containing my signature panel. the blue sashing gives a completely different look to the neutrals on the front! I have laid the blocks differently too – to form a type of ladder. The backing fabric is a small yellow check, not the solid it appears in the larger photo.
 finished back backing fabric
My sewing time is taken up with quilting the Wonky Log Cabin quilt; then I’ll get to the Scrappy Disappearing Nine Patch.

In the meantime, my knitting time is spent trying to catch up with my mum who is powering ahead knitting blanket strips. Come back for my next post and see another of her knitted blankets that I have finished.

I'm linking this post with WiP Wednesday over at Freshly Pieced blog. Why not pop over and see what other crafters are up to?

May your stitches bring you much joy.
Lynne

Tuesday, 27 January 2015

fourth fifth finish in ‘fifteen

I admit that none of these projects began with me. However, I did finish them.

Firstly there were two quilts for which I had to make binding, attach and hand stitch. For our quilting group, they were big quilts; both of them were 280” around.
four patch Triangle Flowers and Brights quilt

Then there was the quilt donated by my quilting teacher. When donated, it was at the basted stage so the quilting and binding are my work ( although K. made the binding which was a time saver).
Kerrie's quilt finished 

A couple of years ago, someone donated a pile of 9.5” QAYG string blocks. I made a quilt from some of them that was shown at the Airing of the Quilts in 2014. 
Diagonal Strings finished

While sorting through UFOs at the beginning of January, I found another 28 blocks. That wasn’t enough for another quilt so I made another 14 blocks – and in the process discovered that I don’t really like making QAYG string blocks!

Nevertheless all fourteen were made and the quilt was put together. I thought the blocks looked dull and decided I would probably not make another of these quilts in the future.

I chose a royal blue printed fabric for the sashing. It did a great job of making every individual block like a little window or piece of art in its own right and made the quilt look more cohesive. Better still, the quilt went from being dull and lifeless to being quite a ‘happy’ quilt.

Unfortunately, I didn’t have enough of the blue fabric (which was left over backing fabric from the quilt in the first photograph above) to make the binding. WM laughed when I told him yesterday that I had to audition fabrics for the binding. I wanted a darker blue but didn’t have enough of any blue fabric that worked so I changed to red. I found a reddish-brown that had tiny blue dots on it that I thought worked. Of course, the dots are so small that the fabric reads as solid maroon from even a short distance. This is a very inaccurate photo of the colour which is much darker in reality but at least the photo shows the blue dots!
Scrappy Strings 2015 binding fabric
I finished hand-sewing the binding at 12:30 this morning – I didn’t intend to stay up to finish it but you know how it is – once I was approaching that fourth corner I couldn’t put it down. I like the way the blocks seem to fold in and out!
Scrappy Strings 2015
Speaking of corners – this is the first time in nearly five years of quilting that I have four perfectly mitred corners on the back and front of a quilt! Woo-hoo!
 Scrappy Strings 2015 corner detail
That’s my fourth finish for this month – I’m so pleased. Maybe I have time to get my Bargello table runner quilted and bound before the end of the month? I have to make a back and quilt it before I can bind it!
2014 blue Bargello top completed

ETA: I did get my fifth project finished before the end of the month! You can see it in this post.

How is your January progressing?

I’ll be linking this post with WiP Wednesday at Freshly Pieced, Binding Blitz at juliekquilts and Thank Goodness It’s Finished Friday as they go live this week.
WIP Wednesday at Freshly Pieced

Wednesday, 14 January 2015

more works in progress

Before I continue, thank you to all the people who left comments in my Sunday post about binding quilt – it seems we all use more or less the same method!

My year will not continue in this vein. Right now, many Australians are on their summer break. Schools are having their summer holidays/vacation. Nearly everything I am involved with is in recess until later in January. That means I have plenty of time to play in my sewing room if I feel so inclined.

Since my post last Wednesday about works in progress, these are the projects that have had some attention:

THE FOUR PATCH QUILT

I only had to finish sewing down the binding on this quilt. However, I had a lot of trouble with the fourth corner, even more than usual, so I had to unpick the binding and carefully sew it back on again. The fourth corner is now the best corner of the lot! I referred to my issues with mitred corners in my post on Sunday; this is a skill I really want to master this year, sooner rather than later. Here’s a photo of the finished quilt (not my work remember; I only added the binding -- I wouldn’t mind laying claim to it though! It’s a great pattern beautifully constructed; if a little too large for me to hold up for the photograph!).

four patch

TRIANGLE BRIGHTS AND FLOWERS

The only task left on this quilt was to hand-stitch the binding down. I completed this by the bright, fluoresent light of my sewing room around one o’clock one morning! This is another beautiful quilt (not made by me) but, again, too big for me to hold the width while being photographed!

 Triangle Flowers and Brights quilt

K’s PROJECT

This was the project I showed in my post on Sunday. I was quite surprise and pleased to find that I could quilt almost the whole block in one continuous line – joy! It may not look like it but, with the exception of the two grey lines which were quilted in a different colour, this was how it was done. Quilting gloves and the extension table for my sewing machine made the job easier too!

Kerrys quilt block quilting

Despite my joy at completing this project, I’ve decided that quilting in the ditch and dragging a twin-size bed topper through my wide-necked machine are not my favourite parts of the process!

QAYG

Between bouts of quilting, to alleviate the stiffness in my shoulders and neck, I tried to work on the QAYG blocks. I found and cut some batting and backing. I learnt, very quickly, that pre-cutting QAYG backs the finished size is a recipe for disaster! Of course, this makes sense given that we always make our backing larger than our quilt top before quilting and trim away the excess afterwards! So, after carefully cutting several backings to 9.5”, it took only two strips to realise that wasn’t going to work. Fortunately, I have a lot of fabric so making new backings, 10.5” this time, wasn’t a problem. I will save the 9.5” squares (they’re all the same fabric) for another project.

I made a mess of the first block made on the 10.5” backing by not using strips that were long enough! We live and learn and now I know two ways not to do it! Plus I have one orphan block for another project! I watched several videos about QAYG (hurrah for YouTube) and thought I could see my way forward with this project.

Today, I am feeling unexpectedly lethargic (despite a full night’s sleep) so have been pottering on this project. Unfortunately, it means I’ve learnt yet another way not to make it work! The pre-existing blocks are made in a particular way, with a 9.5” front and back and a piece of 9” wadding centred between! I started with a 10.5” back and made all my strips the same (diagonal) length as the ever-shrinking back (it’s being quilted remember) but the wadding moved and ended up less than a quarter of an inch from the edge of the front and back in some places and nearly an inch away from the edge in others! I thought securing it with pins while I sewed on the strips was enough but apparently not enough to stop it from shifting! Thank goodness for seam rippers! Any hints you can give would be greatly appreciated since it’s another three weeks before I see my teacher again!

CRUMBED CHURN DASH

To complete each churn dash block, I need four ‘side’ units and four ‘corner’ units. I am making the corner units with HST (as expected) but I’m making the ‘side’ units from one strip and two squares – it’s a little bit different and helps remind me that these are scrappy blocks after all! I was very excited to see the first Churn Dash block come together – this is my first ever churn dash block and I’m very pleased!

first block completed

So far, I have made two complete blocks and have eight extra ‘corner’ units completed.

Other than that, I have also cleaned my machine – I try to remember to do it regularly, especially after working with batting: that always seems to make additional lint!

I’m not sure that there will be a “works in progress” post next week – I will be away for three and a half days: tomorrow, WM and I are joining several other couples from church for a long weekend away at Sanctuary Point on the south coast.

I’m linking this post with WIP Wednesday over at Freshly Pieced blog (hosted by Lee) when it goes live later today.

WIP Wednesday at Freshly Pieced

What about you?
What have you been working on this week?

Saturday, 4 October 2014

Something Old, Something New – October edition

The last week of September was very busy, including an unscheduled train trip north to bring DD and the Grandboys back here to attend a church conference that went from 25th to 29th September. And what a fabulous conference it was! I was on the music team and sang at every day session; which was eleven of the fifteen sessions so my voice was a little tired by the end of the ‘weekend’. Can’t wait for next year’s conference!

Before the conference, I had quite a bit of crafting time in the first part of the month, both sewing and knitting, so was able to achieve more than I expected.But this post isn’t about all my projects – just two:

Never too hot to Stitch!

My Something Old project was also my Relaxing Robin challenge which is being held over at Dawn’s blog, sewyouquilt2. Unfortunately, I missed September’s link up because of my unexpected trip north then having a house full of over-excited people! I did make some progress but I want to devote a special post to my progress so I’ll just show you the original block here.

pinwheel #1

The challenge will be to turn two 9” blocks into a ful quilt measuring approximately 54” x 64”!

My “Something New” project was very successful. I had planned to make a start on a braided rainbow quilt by learning how to make one pioneer braid. I soon discovered that it take much longer to press and cut all the strips for the braid than it does to actually sew the strips and that it is easier to sew two braids at the same time (so to speak) so that there is always something under the machine needle. So here are my first two braids made from twenty-three pairs of 7” x 2.5” strips.

orange braid 

yellow  braid

But wait, there’s more…

Here are the second two braids

red braid

green braid 

and the third set of two:

blue braid

incomplete purple braid

I had to stop work on the purple braid when I ran out of purple scraps and fabrics. I just needed eight more fabrics before I began repeating the fabrics! :-(

A very successful month indeed, as far as the Something Old, Something New challenge is concerned.

So, now: what will I do in October?

I’m not really feeling enthusiastic, but I need to make some forward progress on the Country Houses quilt, so I have chosen that for my Something Old project. First I have to pick out the six houses I carefully quilted into fabric – that may be as far as I get but we’ll see! This, at least, is a lot more doable than setting myself the goal of finishing the whole quilt!

side panel house too subtle

For my “Something New” project, I am going to make at least one of these ‘snap’ closing bags.

I’m thinking of making these as Christmas gifts for each for my classmates, teacher and the two shop owners, but I'll make one for myself first to see if I enjoy the process before I start out with a plan to make ten!

What about you?
How did you go in September?
What plans do you have for October?

Please link here with your specific blog URL so we can all visit and cheer you on.

Wednesday, 2 July 2014

Something Old, something New – July edition

Never too hot to Stitch!
What a month June turned out to be: five days staying with my mother, three weeks with bronchitis, another three-day trip away to tutor two knitting workshops (“stranded colour knitting” and “using slipped stitches for colour and texture”) and hosting a couple who were billetted with us for four days! Needless to say, not much sewing happened during the month.

My stats show that less and less people are signing up for Something Old, something New each month; in fact, less and less people are visiting my blog period! I am tempted to stop the linky party right now but I need something to keep me working on my old projects – they have a way of wearing me down after a while! Just knowing they are there, in the background, whatever life throws at me, makes me want to get them finished! So, Something Old, Something New will continue, despite the fact that I seem to say the same thing -- “almost no progress” -- every month!

In June, my “Something Old” project was to have been a pair of curtains I started way too long ago. Those poor old curtains never even made it out of the cupboard! What little time I had in front of the machine (not a lot when you’re coughing ‘fit to bust’) was spent working on the Country Houses quilt, which had been my Something Old project earlier this year. I was working away on it, making reasonable progress, when I found a small hole right on the seam line of one of the central blocks! I had to unpick some quilting, and open the backing and wadding (it’s a quilt-as-you-go project) to access the seam in question. I really didn't know what to do so I took it to my quilting teacher. I hadn’t been in class for weeks because I hadn’t wanted to share my germs so it wasn't until the very last day of June that the hole was repaired! (Sorry, I forgot to take a photo and the repair is almost invisible!)

I did spend some sewing time at home practising my curved piecing
2014 curved piecing
and in class (after repairing the hole) on foundation piecing so at least some progress was made on my Something New techniques!

My crafting plans for July are as follows:
  1. Something Old -- repair the first pair of 4ply (sock weight) socks I ever knitted: they were for WM and I dropped a stitch while grafting the toe; I have had to rip back several rows to find that stitch!
    Mark's first sock under repair
  2. Something New -- sort my yarn stash, decide what's staying and what’s going then update my stash records on Ravelry! (There’ll be a separate post about this so no photo here)
  3. Works in Progress -- sew in the ends of the pair of socks I finished knitting this past weekend (Socks for Someone #4); it took me eight months to knit the first sock and less than a week to knit the second! They were completely finished on 1 July.
    2014 Socks for Someone #4
  4. Something Old -- graft the toes of the Tidal Wave socks I started a long time ago (the original pattern can be seen here on Ravelry). According to my Ravelry notes, the socks were in hibernation because they were possibly too small (too short?) but it's time to get them off the needles and move on!
    tidal wave sock
  5. Something New -- shadow knitting: I’m currently making a scarf which has the illusion of a piano keyboard (Ravelry link)
  6. Works in Progress -- sew in the ends of my Nouveau Log Cabin knitted blanket (seen in this post about knitting)
  7. Something Old -- finish the Country Houses quilt (you’ve seen this often enough – no more photos till it’s finished!)
  8. Something Old -- knit one fingerless mitten (man size)
    man's mitt
  9. Something New -- a new quilting technique for me: Bargello
  10. Something New -- cast on Socks for Someone #5 (I always have socks on my needles) -- I cast on last night while I was wastching television; I didn't have enough light to cast on navy mitts (the colour in the photo above is nowhere near dark enough) and I can't sit there doing nothing!
    2014 Socks for Someone #5
I have decided that I will do all ten of these things in July, which is quite ambitious considering how little I usually get done! Some of them are only little projects  so I think it's possible to get it all done... I have listed them here in the order I plan to do them but, who knows?!

What about you?
How did you go with your plans in June?
What are your plans for July?

Remember, your “Something New” project can be to start something new or learning (or practising) a new technique! (This month I'm doing both!)

Please link the URL of your specific blog post here so others can come and check out what you’re up to!

Friday, 13 December 2013

another finish

Diagonal Strings is done. It probably shouldn’t have taken as long as it did. The blocks weren’t made by me. They were already quilted. All I had to do was cut and add sashing and cut and add binding.

But you know what it’s like when you’re not feeling the love for the project. It waits. It occasionally growls at you as you walk past.

And eventually you have to get it finished if only to silence that “so close and yet so far” feeling.
Diagonal Strings finished 
Anyway, it’s done and it’s even got a label (I often forget those on the quilting group quilts). This is the first label I have added while attaching the binding – what a great time saver; and the label is less likely to come adrift too!
label and sashing
Isn’t that sashing fabric pretty? A whole metre of that fabric was donated; some people are so generous. I also found about half a metre of the brown fabric I used for the binding in our store cupboard; I wasn't expecting to use brown, I was looking for a burgundy, but the brown works perfectly. Don’t look too closely at my corners; I must have gone too close to the corner with my machine stitching while attaching the binding (I’m still a newbie, remember!) – I didn’t have enough fabric to turn properly!

Now it’s ready for next year’s Airing of the Quilts in April. I’m halfway – I promised myself I’d make six and I’ve done three The fourth is nearing completion so I’m not too far behind.

And in just twelve days, Christmas will be behind us and I can look forward to some solid crafting time.

This weekend, WM and I are off to a little village called Ebor in the New England Ranges (approximately 570km, 355 miles from here)  to share Christmas with Mum, my sister, two nieces and their boyfriends, my nephew, my 8-month-old great-niece (this is my sister's first Christmas as a grandmother), DD, SIL and our Grandsons!
2013-12-01 Ben and Daniel
It’s these two I’m most excited to see! Aren’t they handsome? (a child at pre-school produced that scar on Older Grandson’s face – we’re praying it’s not permanent!) The best news is they’ll be here for a whole week and their parents will be here too so we can just be grandparents!

There won’t be much crafting time but family is way more important, right?

Linking up with Thank Goodness It’s Finished Friday which is being hosted by M-R Charbonneau over at Quilt Matters.

Tuesday, 22 October 2013

we interrupt this program

My program for completing UFOs this month has been interrupted by the devastating bush fires still raging just a  few kilometres from here.

Over 200 homes have been lost and more than 50,000 hectares of land destroyed by the fires. And that’s just in our local area – there are fires blazing right across the state while our southern neighbours in Victoria have experienced a return to winter!

The quilting group that I belong to has decided to make quilts specifically for those who have lost everything in these dreadful fires.

My sewing goals for this month included two quilts to be shown at the Airing of the Quilts next April plus a quilt for our bed. None of these is absolutely necessary right now – so they have been put aside in favour of making quick quilts to be donated as soon as possible.

My knitting goals included a pair of socks (finished two weeks ago but not blogged about) and a cardigan for myself. I have not had any desire to work on the cardigan so have put it aside to work on sewing rectangles (knitted by somebody else) into a blanket. I started this when the Grandboys were here; both of them have done some of the stitching. This blanket needs to be finished and will also be donated to the victims of the fires.

Even WM has been helping me by making bias tape for the quilt I am making from “quilt-as-you-go” blocks (made by someone else and donated to our quilting group).

The photo (taken on my iPad on a grey day) shows my living room floor as I work out my layout for the knitted rectangles. Beside it I have placed one completed row of the QAYG blocks. So far I have completed three rows and have five more to go before I can join them to make the quilt.
2013 knitted patchwork
Please excuse me for not stopping to find and insert more photos – there are more pressing issues at hand and I need every minute to get my new projects done!

If you are so inclined, please join me in praying for soaking rain for New South Wales – the gardens need it, the farmers need it and the fire-fighters desperately need it!

Thursday, 27 October 2011

string blocks in a quilt

Jan Mac, of Oz Comfort Quilts, has been very busy. Do you know that she has donated over 480 quilts so far this year? That's an amazing achievement and she deserves support and congratulations.

DD and I sent twenty-five string blocks a couple of weeks ago. Before we sent them, I forgot to take photos. Jan has now used some of them in two quilts and our blocks are playing nicely with the others.

Once again I have borrowed the photo from Jan's blog. If you imagine the quilts as a grid with the columns labelled A-E (from left to right), and the rows labelled 1-7 (from top to bottom), I will point out which blocks are ours!


A1, D1
A2, C2, E2
C3
A4, D4
B5
B7,D7


Now that you know what our blocks look like, you can see the second quilt on Jan's blog and find ours for yourself! LOL

And, let me finish with a quote from this post by Bonnie Hunter which is a great reminder to those of us who strive too hard for perfection:

Hand crafted does not, will not ever mean PERFECTION. The pursuit of excellence is worthy, the pursuit of perfection is INSANE. IMPOSSIBLE…..

Thursday, 20 October 2011

playing catch up

I am nearly a week behind with my blog reading because I was sick again last week. If I am a follower of your blog, I am trying to catch up. At the moment I have about 300 posts to read so I'm doing my best. I may not comment in my attempt to catch up -- I know I will fall behind again this weekend; I always do because DD and the Grandboys arrive on Friday mornings and stay till after dinner on Saturday nights which precludes spending time on the computer!

Last week I forgot to take photos before DD carefully rolled up twenty-five QAYG blocks and crammed them into a post bag.

They reached their destination last Friday. I have "borrowed" a photo from Jan's Oz Comfort Quilts blog to give you some idea of what we've been up to. The blocks are 10.5 inches square (unfinished) and I can't wait to see how they play with other donated blocks to make a quilt. They don't look so good after being rolled tightly but it was the most efficient way to fit blocks into the postbag!


Monday, 10 October 2011

Wonky String quilt finished

Last Wednesday I wrangled this quilt through the sewing machine to complete the sashing on the back.

The quilt is made in a "quilt as you go" method. The blocks were originally made by (someone unknown to us)sewing strings to a calico foundation. DD and I then quilted them onto wool/polyester wadding and a backing made from hand-dyed fabric that had been donated to the quilting group.

The combination of the thicker backing fabric and the extra layer of fabric between the top and the batting made the quilt very stiff and heavy. When I tried to sew the sashing on, I really had to wrangle the quilt. When it hit the back edge of my sewing table, it was so stiff it didn't bend and go down the gap between the table and the wall, it just crashed into wall and sent my stitching way off (It's rarely straight at the best of times).

I finally got the machine work finished. I'm not at all happy with it but it's done. On Thursday I took the quilt to the Caring Hearts Community Quilt group monthly meeting to hand sew the binding down. I made the mistake of stitching every 1/4 inch or so - only to remember (too late) that binding a quilt is not the same as hemming a pair of trousers! Nevermind, more stitches is better than less (I guess).

I finished sewing the binding on Friday night and washed the quilt and put it in the dryer yesterday.

So here, for your viewing pleasure, Wonky Strings completed!