Showing posts with label WIPs. Show all posts

Friday, 8 January 2016

works in progress


The first week of January is almost done. It was as wonderful to have various family members visiting at Christmas and to visit other family members, but it seems a long time ago, despite being less than two weeks! Even New Year’s Eve seems longer than a week ago.

WM has returned to a normal work roster after a four-day weekend for Christmas and a three-day weekend for New Year. It’s summer here (although you’d never know it from the cool temperatures and rain we've had this week) so my quilting class is in recess until February. I've had lots of time in the sewing room and I've tried to make it profitable.

In the weeks leading up to Christmas, I spent many hours pressing, sorting, cutting and storing scraps. This is after a couple of days of that activity (the strips were cut specifically for the project mentioned further down this post):


Some of my tubs (shoe-box sized plastic containers) were getting very full; most notably the ones containing 2 1/2" squares, 3" squares and strings/strips of all sizes.


Before Christmas I began a “leader/ender” project that took over my sewing time. The project I had planned required me to make lots of HST units measuring 2.5”. That took care of the 3” squares – I still haven’t made enough and I'm running out of squares! So far I've made 320 units (I need 400) and trimmed 104 of them! They call to me constantly from the edge of my cutting table where I have them stacked in groups of twenty for ease of counting. Here are 200 stitched HSTs waiting to be trimmed!


The unused squares call to me every time I sit down at my sewing machine – they are right beside hard-working Jan waiting for the next time a leader’'/ender is needed.


In November, DD and the Grandboys came for a visit. They wanted to sew and decided on ‘spider webs’ so we began making monochrome 60° triangles from strings which we had first sewn into 8.5” squares. They, of course, did very little sewing and little progress was made. After they left, I cut up 144 x 9” strips (of various widths) in five colours –yellow, green, purple, blue and red. I wanted to see how it would work out and sewed all the yellow strips into blocks then cut the triangles. It didn't take me long to realise that we were, in fact, not making spiders webs but giant hexagons!

I looked at pictures on the internet and discovered that spider’s webs were made up of eight triangular units, not six; and that they were generally not made in monochrome fashion!

So, when DD and the family were again for Christmas, we made the decision to use the triangular shaped wedges in a different way; inspired by this pattern in the book Scrap Republic (by Emily Cier). Emily’s pattern is called “Slices”.

We are not yet sure how we will put the units together – that is still quite a way off. We have made all the yellow, green and purple triangles, leaving some of the red and blue ones (their favourite colours) for the boys’ next visit (probably April). Here is the stack of “wedges” we had prepared by the end of December.


The good thing is, because we made squares first them cut the 60° triangles, I have lots of ‘wedges’ left over – there will be almost enough for another small quilt!


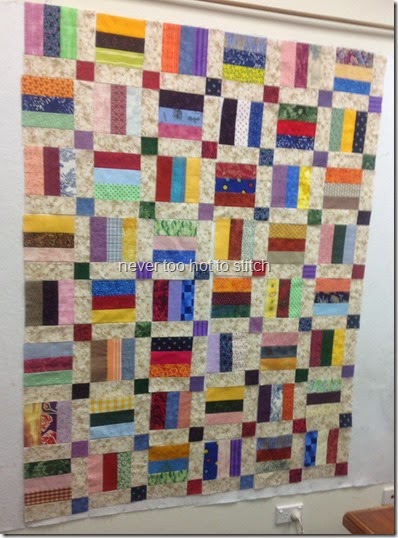
Despite being ‘surrounded’ by these two works in progress, on Monday, my first day of sewing without any need to go anywhere or do something else, I returned to an almost forgotten UFO. I started Green Strips and Triangles in July 2014 but abandoned it as being too much trouble. I distinctly remember I couldn't work out how to make sure the strips were long enough to make the 10.5” (unfinished) squares I required. I didn't want to make the blocks QAYG but somehow, the strips never seemed to work! Time, of course, gives a fresh perspective. I realised in the wee hours of Monday morning that I could use foundation piecing to make the blocks and, if I used a wide strip on the centre diagonal, I could make an 11” square (I actually made them 11.25” to give myself a little leeway), I could then cut the white fabric into squares, sew 1/4” from the central diagonal then cut it into two pre-made squares! Why did I not think of that back in 2014? (Although I had made QAYG blocks on wadding/batting, I hadn't ever done foundation piecing on paper back then but now, having learned the technique, it made perfectly good sense!)

Alas, all that preparing foundations then tearing them away afterwards became such a time drain – I decided there had to be a better way. Eventually, I marked out a ‘template’ on my cutting mat and used that. It worked pretty well; not as well as the paper foundations I admit but I got the job done more quickly!


In 2014 I had made four blocks, two of them  wrongly! In three days this week, I made the other twenty-eight blocks I needed! Here are three of them in the setting I plan to use.

As I sewed and pressed and cut and sewed some more, I thought about how I will quilt it... The strips are easy; I'm pretty sure that will be straight line quilting, running parallel to the strips themselves. But what of that self-striped triangle -- what should I do there? I am not competent at FMQ and this is a donation quilt. On the other hand, it might be time to start practising!

What do you think?

I'm linking this post with WiP Wednesday over at Freshly Pieced.

Thursday, 23 July 2015

there is work in progress

At Easter, DD and the family came to visit – it was so good to be able to spend time with them again; especially since DD and I got to spend some time together in the sewing room. Older Grandson helped to sort scraps and it wasn't long until he wanted to sew too. He loved sitting on my lap and feeding fabric in to the machine that was running on the slowest speed possible. At the end of the weekend, we had nineteen scrappy quarter-log cabin blocks of varying sizes made (they weren’t square and ranged in size from 9” to 11.5”). Unfortunately, I didn’t thing to take photos of the blocks that we made but I do have some photos of Older Grandson hard at work!
 2015-04-03 Ben sews on machine 2 2015-04-03 Ben sews on the machine 2015-04-03 Ben irons

In May, it was announced at our quilting group that there was going to be a log cabin challenge for all of us to use up scraps! Seems like I was already ahead of the game! LOL

I searched the internet for inspiration – I had absolutely no idea how to put those blocks together given their different sizes and shapes. But sometimes, I just have to be patient and let ideas percolate. In the end I decided to go with a wonky setting but I still had no idea how to go about it. I started looking at tutorials, but all the ones I found were for making sashing on all four sides of he block. I wanted to add sashing on only two sides. In the end, I found my own away to do it – the wider you cut the sashing and the more fabric you are prepared to ‘waste’, the better this works. Again, it didn’t occur to me to take photos of my work in progress – you can see how out of the habit of preparing for blog posts I have become!

Armed with twenty blocks (I made the extra one), I headed to class at my LQS. They have a design wall – I do not! My teacher, who loves traditional patterns and Civil War fabrics, is quite bemused by me sometimes, I think! Here I was with a totally radical modern approach to quilt blocks and I hadn’t even consulted a pattern! I did take a photo of my layout on the design wall but have since deleted in from my iPad – because I’ve finished the quilt top. Here it is for your enjoyment:
 finished front

I have also finished the backing.
finished back

The fabric used for the sashing and the backing is Saffron Craig’s Ginkgo Blossoms (c.2009). I used about three and half metres to make this quilt which will finish at 52” x 64” and is made up of twenty 12” blocks plus extra sashing down one side and across the bottom.
This one is basted and in the process of being quilted.

While I was on a roll, I made the backing for another quilt which I had finished in October last year.
on design wall

It is made from ‘Disappearing Nine Patch’ blocks with one modification – I made the neutral pieces of the nine patch smaller than the coloured parts; thus giving a thinner sashing than would otherwise be seen.
ready to cut and disappear

Here is the finished backing, containing my signature panel. the blue sashing gives a completely different look to the neutrals on the front! I have laid the blocks differently too – to form a type of ladder. The backing fabric is a small yellow check, not the solid it appears in the larger photo.
 finished back backing fabric
My sewing time is taken up with quilting the Wonky Log Cabin quilt; then I’ll get to the Scrappy Disappearing Nine Patch.

In the meantime, my knitting time is spent trying to catch up with my mum who is powering ahead knitting blanket strips. Come back for my next post and see another of her knitted blankets that I have finished.

I'm linking this post with WiP Wednesday over at Freshly Pieced blog. Why not pop over and see what other crafters are up to?

May your stitches bring you much joy.
Lynne

Wednesday, 18 March 2015

plenty of sewing time

Just popping in with a short post …

Mum is doing well; she has improved physically in the week she has been here which is a good sign. She is no longer stooped and shuffling; being undernourished will do that to you! Instead, she is eating very well and has regained her usual stride. Yesterday she even worked out in the garden with WM for a couple of hours.

Her biggest interest is reading and she spends hours absorbed in books. This frees me up to be in the sewing room so I am getting quite a bit done.

A couple of weeks ago, my quilting teacher donated a partially completed quilt to Caring Hearts Community Quilters – all I had to do was finish the quilting, make binding, attach it and sew it down. I have done all but the last task, so no photos until I show you the finished project!

My Jacob’s Ladder Goes Barn Raising is quilted. Life is so much easier when I think about the quilting before I pin baste; then I can position the pins out of the way of stitching lines. The quilting was done in no time but it seemed to take almost as long to sew in all the ends! You can’t see it here (because the photo is pre-quilting); I sewed diagonal lines about 5” apart through the centres of the squares that make up the diagonals.
JLGBR top finished

The binding is cut and waiting for the strips to be joined.
binding cut

I have also been knitting! Shock of shocks!!

In the past three days, I have worked on Crinkles Hoodie by doing a three needle bind off on the shoulders and starting the first sleeve (the photo, which is of the back, is really not worth showing but I know you like pictures! LOL)
2014 Crinkles Hoodie back

Last December, I started knitting Charley Bear for my great-niece who will be two next month; I began on the train on 16 December and haven’t touched it since. On Monday, I stuffed the body and head. I am so not enjoying this! There are so many fiddly little pieces to come, of the type: CO 4 stitches, K 2 rows, increase either end of next row, knit 1 row. Bind off! I have no desire to be a toy maker! The head is on the left; it seems proportionally too large for the body!
charley bear

And I’ve finished a pair of small women’s socks which were started on 21 February. The second sock was cast on 6 March.
socks for someone #8

My current reading is varied, but includes 100 Days of Real Food by Lisa Leake. She started a blog a few years ago and it led to a book! Our copy only arrived yesterday so I’m not really in a position to write a review just yet. It certainly is an interesting read.

There are some advantages to having had to cut back on my away-from-home activities, at least for a few weeks! ;-)

Linking up with WiP Wednesday and Yarn Along when they go live.
WIP Wednesday at Freshly Pieced         


PS Is anyone else having trouble with Firefox working very slowly or is just us?

Thursday, 12 February 2015

pretty (scrappy) in pink –- a work in progress

Deb, who blogs at A Simple Life Quilts, and I were email-chatting the other day about quilts in progress. I mentioned that I had a pink and purple row-by-row quilt in progress and should pull it out, given that the colour for the Rainbow Scrap Challenge for this month is pink.

This is the story:

Last year, I wanted to learn curved piecing in my quilting class; at the time pink was the colour of the month. I chose to make scrappy pink blocks (hey, why not try something a little more complicated when you're learning a new technique? LOL) So I made these blocks based on an idea in Scrap Republic by Emily Cier. Each of those Drunkard's Path blocks is 4.5”.
curved piecing completed
I laid them out in a traditional style Drunkard’s Path meander but I didn’t like it so I turned them into circles (as the photo above suggested).
circle blocks completed
I realised I didn't like making four-inch curved blocks enough to make a whole quilt so what was I to do? Make a row-by-row quilt, of course.

Some of my classmates and I went on to do foundation piecing: it  was still February so guess what colour I used for my foundation piecing?

Here are the four blocks I’ve made so far:
first four foundation blocks 10 Feb 2015

I still have two more to make; they will have the same fabric in the centre. Then I’m not sure whether or how I will sash them.

At home during February, I thought I would use some more of my pink scraps in a new-to-me piecing style: tumbler blocks – here are the first five joined
first column of tumblers joined

and here they are on my design wall (at the old house) in the layout I had chosen:
2014 pink tumblers

Since then I’ve realised I need to go wider with only five rows of blocks (hence the five joined together above).

Kate, who blogs at Kate’s Quilting (and other arty stuff), and I shared a couple of emails about scrappy quilts generating more scraps and that was certainly true of my Drunkard’s Path blocks – there were a lot of scraps left over. So what would I do with them? Turn them into improv crumb piecing, of course!
first pink blocks first purple
They’ll go on the back of the pink and purple row-by-row quilt; I can’t help sneaking a bit of ‘modern’ piecing into the backs of my quilts (look here for an example). Because most of them go to older people in palliative care units, we tend to be fairly traditional in our quilt making – but I always put a signature panel in the back of mine which tends to be a bit modern looking! This probably won’t be so much a panel as scattered; like this one (Icy Improv Pods by Elizabeth Hartmann of Oh! Fransson) or this one (though not as detailed as this which is Faraway Fields by fellow-Australian, Jules, of Procrasticraft).

So, this row-by-row is the project I’m adding to during this month of pink; and also in the month we have purple in the Rainbow Scrap Challenge.

I’ll be linking this post to Scraptastic Tuesday at Mrs Sew and Sow, WiP Wednesday over at Freshly Pieced blog, Needle and Thread Thursday at My Quilt Infatuation and the Rainbow Scrap Challenge (RSC) at So Scrappy blog as they go live this week.
WIP Wednesday at Freshly Pieced Scraptastic Tuesday
Needle and Thread Thursday
RSC 15
Are you joining any of these linky parties this week?


Wednesday, 14 January 2015

more works in progress

Before I continue, thank you to all the people who left comments in my Sunday post about binding quilt – it seems we all use more or less the same method!

My year will not continue in this vein. Right now, many Australians are on their summer break. Schools are having their summer holidays/vacation. Nearly everything I am involved with is in recess until later in January. That means I have plenty of time to play in my sewing room if I feel so inclined.

Since my post last Wednesday about works in progress, these are the projects that have had some attention:

THE FOUR PATCH QUILT

I only had to finish sewing down the binding on this quilt. However, I had a lot of trouble with the fourth corner, even more than usual, so I had to unpick the binding and carefully sew it back on again. The fourth corner is now the best corner of the lot! I referred to my issues with mitred corners in my post on Sunday; this is a skill I really want to master this year, sooner rather than later. Here’s a photo of the finished quilt (not my work remember; I only added the binding -- I wouldn’t mind laying claim to it though! It’s a great pattern beautifully constructed; if a little too large for me to hold up for the photograph!).

four patch

TRIANGLE BRIGHTS AND FLOWERS

The only task left on this quilt was to hand-stitch the binding down. I completed this by the bright, fluoresent light of my sewing room around one o’clock one morning! This is another beautiful quilt (not made by me) but, again, too big for me to hold the width while being photographed!

 Triangle Flowers and Brights quilt

K’s PROJECT

This was the project I showed in my post on Sunday. I was quite surprise and pleased to find that I could quilt almost the whole block in one continuous line – joy! It may not look like it but, with the exception of the two grey lines which were quilted in a different colour, this was how it was done. Quilting gloves and the extension table for my sewing machine made the job easier too!

Kerrys quilt block quilting

Despite my joy at completing this project, I’ve decided that quilting in the ditch and dragging a twin-size bed topper through my wide-necked machine are not my favourite parts of the process!

QAYG

Between bouts of quilting, to alleviate the stiffness in my shoulders and neck, I tried to work on the QAYG blocks. I found and cut some batting and backing. I learnt, very quickly, that pre-cutting QAYG backs the finished size is a recipe for disaster! Of course, this makes sense given that we always make our backing larger than our quilt top before quilting and trim away the excess afterwards! So, after carefully cutting several backings to 9.5”, it took only two strips to realise that wasn’t going to work. Fortunately, I have a lot of fabric so making new backings, 10.5” this time, wasn’t a problem. I will save the 9.5” squares (they’re all the same fabric) for another project.

I made a mess of the first block made on the 10.5” backing by not using strips that were long enough! We live and learn and now I know two ways not to do it! Plus I have one orphan block for another project! I watched several videos about QAYG (hurrah for YouTube) and thought I could see my way forward with this project.

Today, I am feeling unexpectedly lethargic (despite a full night’s sleep) so have been pottering on this project. Unfortunately, it means I’ve learnt yet another way not to make it work! The pre-existing blocks are made in a particular way, with a 9.5” front and back and a piece of 9” wadding centred between! I started with a 10.5” back and made all my strips the same (diagonal) length as the ever-shrinking back (it’s being quilted remember) but the wadding moved and ended up less than a quarter of an inch from the edge of the front and back in some places and nearly an inch away from the edge in others! I thought securing it with pins while I sewed on the strips was enough but apparently not enough to stop it from shifting! Thank goodness for seam rippers! Any hints you can give would be greatly appreciated since it’s another three weeks before I see my teacher again!

CRUMBED CHURN DASH

To complete each churn dash block, I need four ‘side’ units and four ‘corner’ units. I am making the corner units with HST (as expected) but I’m making the ‘side’ units from one strip and two squares – it’s a little bit different and helps remind me that these are scrappy blocks after all! I was very excited to see the first Churn Dash block come together – this is my first ever churn dash block and I’m very pleased!

first block completed

So far, I have made two complete blocks and have eight extra ‘corner’ units completed.

Other than that, I have also cleaned my machine – I try to remember to do it regularly, especially after working with batting: that always seems to make additional lint!

I’m not sure that there will be a “works in progress” post next week – I will be away for three and a half days: tomorrow, WM and I are joining several other couples from church for a long weekend away at Sanctuary Point on the south coast.

I’m linking this post with WIP Wednesday over at Freshly Pieced blog (hosted by Lee) when it goes live later today.

WIP Wednesday at Freshly Pieced

What about you?
What have you been working on this week?

Tuesday, 19 August 2014

Grab Bag Challenge and other knitting

warning: a long, yarn-related post; no fabric here, sorry!
~~~~~~~~~~~~~~~~~~~~~~~~

I had intended to get this post up ten days ago but I needed photos… then DD and the GrandBoys made a surprise visit. Needless to say, I didn’t give much thought to posting anything on my blog!

Despite the fact that I had been in a groove with my sewing over the previous few weeks, I had also completed a fair bit of knitting. My most recent post regarding knitting (as opposed to yarn) was in mid-June so I’m going to talk about all my projects since then; whether completed or in progress.

At the end of June I tutored two workshops: one on stranded colour knitting, the other on slipped stitch knitting so there were a few samples that needed to be knitted.

I’ve already showed you the two slipped stitch scarves in this post, so here are some other slipped-stitch patterns: a slipped stitch beanie and a sample slipped-stitch square that could be used in an afghan/blanket:

 slipped garter stitch sample slipped stitch colour beanie  

For the stranded colour workshop I knitted two hats; the second shows a traditional Norwegian motif I found on the internet.I couldn't get it on my head so I had to put my hands inside it for the photo – it’s not really that shape!.

 stranded colourwork beaniestranded colour work Norwegian star motif

I finished Socks for Someone #4 and cast on Socks For Someone #5; I’ve finished the first sock, except for the grafting of the toe and the sewing-in of ends, and am on the foot (cuff down) of the second. The socks are my own basic sock pattern for women; 64 stitches knitted on 2.25mm needles.

2014 Socks for Someone #4 2014 Socks for Someone #5 first sock done

In mid-July, I tutored a workshop on shadow (aka “illusion”) knitting. I didn’t have my scarf finished in time for the workshop, although I did take it along as a work in progress. That scarf is now finished and is seen here pinned out for blocking. The pattern is Counterpoint Scarf, by Jennifer Crawford; free to Ravelry members. The yarn is discontinued: Moda Vera Cynthia (brown) and Moda Vera Jaclyn (cream) – both DK weight, 50% acrylic/tencel. I chose brown and cream because I didn’t have any black 8ply (DK) yarn that was the same brand as any white yarn and it seemed important to have two strands that knitted up to the same gauge. All experienced knitters know that all DK weight yarns are not created equal!

2014 Keyboard Scarf illusion

In this post, I talked about how much yarn I have. I managed to find storage for most of it, except for the “Grab Bags”. There were too many of them to fit in the space I had allocated, so knitting through those has become my priority knitting. I can’t believe my first project for the “Grab Bag Challenge” was completed last December!

I remember that, for the next project, I grabbed a bag of yarn and intended to knit a prayer shawl for the person who donated quite most of my ‘grab bag’ contents. However, the prayer shawl was a lace pattern and I had to set it aside even before I cast on; i usually knit in front of the television, and that just wasn’t TV knitting! When we moved that bag of yarn disappeared into the pile of grab bags during packing; one day it’ll turn up and I’ll be able to knit that shawl.

In the meantime, I have knitted two hats from a pattern called Bubble Gum which is available for free on Ravelry. I think I would have called the pattern “Bee Hive” or “Honey Pot” because it reminds me of a green ceramic honey pot we had when I was a child (not that it ever had honey in it)! My two hats don’t look as nice as the ones on the Ravelry page, perhaps they’ll look better after blocking or with a head in them! I've only shown one, they are basically identical – knitted from the same no-longer-available yarn from K-Mart called Triplequick, a 12 ply (bulky) yarn which I knitted on 6mm needles. It was, indeed, a quick pattern to knit and I completed the two hats, including sewing in ends, over three evenings.

2014 Grab Bag Hat #2

I started knitting a scarf/shawlette from a simple (free from Ravelry) pattern called Forget Me Not using a discontinued yarn called Lambswool 80 (80% wool, 20% nylon) by Patons Australia. In the comments section of my Ravelry projects page I wrote: “life is too short to knit with yarn which feels like string! Even acrylic feels softer in the hand than this yarn so it has been frogged and the yarn has been given to the op shop (thrift store).” The project was aptly named Yarn Shouldn’t Feel Like String but, unfortunately, I forgot to take photos of the yarn before I gave it away!

Then came another hat when I grabbed a bag containing 3 skeins of Sirda Octo, an 8ply (DK)  blend of 80% wool and 20% nylon. I have never successfully knitted a beret; I always seem to have too many rounds and get a lump in the middle where it should lie flat. I had hoped this one would be different; it’s a very pretty lace pattern and the decreases are included in the pattern. But I should have looked at the pictures of the Elfunny Beret on Ravelry more carefully: it had a deliberate ‘lump’ in the centre, accented by doing extra rows! I had to remove the extra rows and add a couple of extra rounds of decreases to make it work. Here it is blocking with the dinner plate still inside! Unfortunately, it’s supposed to be adult size but there's no way I can get it on my medium-size head! Ah well, someone will live it, I’m sure.
2014 Octo Mauve Hat

WM grabbed the next bag (my current knitting project, along with Socks for Someone #5): it contained 329g of yarn called Lincoln Buffalo Wool. The only additional information on the label was that it was mothproofed* pure wool, 6ply (a heavy sportweight or light DK), colour 488, Taupe. No needle size was recommended. I couldn’t find any information online about this yarn specifically or the yarn company in general. It may have been mothproofed forty years ago but I have had to deal with quite a lot of insect damage as I knitted which has left me with lots of ends to sew in! I know it is more than forty years old: the Australian wool industry adopted the metric scheme in 1971 and these balls were labelled “1 oz”!

I decided this time to knit something where gauge was not so crucial and finally settled on  a pattern of a triangular scarf or shawlette called Springtime Bandit. The original pattern was knitted in 10ply (Aran) but I have seen it knitted in 4ply (sock) so it’s obviously very versatile. I didn’t know how far 329g of yarn would go; 8ply wool yarn usually contains about 200m to every 100g so this could be as much as 650m. If it’s a lighter weight than 8ply, it may go even further! The designer, Kate Gagnon Osborn, recommends four pattern repeats; I have done twelve and still have four skeins for the edging!

It has knitted up like 8ply (DK) on 4.5mm needles. Since I am usually a looser-than-average knitter, it will be interesting to see how it goes after blocking! This is what it looks like so far:

  2014 Taupe Buffalo Shawlette 2014 Taupe Buffalo Shawlette detail

I don't’ think I’d describe it as ‘taupe’; its more milk chocolate!

The Grab Bag Challenge is fun; I have no idea what the bag will contain until it is actually in my hands (I’m not allowed to return it to the box, I have to knit it and use up as much of the yarn as possible) the fun part is choosing a pattern that works for the amount of yarn I have (long live Ravelry!) and seeing how it knits up. Most of the bags contain only small amounts so there’ll probably be a lot of hats and/or scarves in my future but that just adds to the fun: small projects are quickly finished then a new bag is selected!

Never too hot to stitch!

It’s winter: cold and raining here (thank God, we were in a drought and needed rain desperately) so it’s great weather to curl up under a hand-knitted blanket/afghan and knit away!

What are you working on at the moment?