Wednesday, 11 November 2015
finished flimsy
Thursday, 23 July 2015
there is work in progress
In May, it was announced at our quilting group that there was going to be a log cabin challenge for all of us to use up scraps! Seems like I was already ahead of the game! LOL
I searched the internet for inspiration – I had absolutely no idea how to put those blocks together given their different sizes and shapes. But sometimes, I just have to be patient and let ideas percolate. In the end I decided to go with a wonky setting but I still had no idea how to go about it. I started looking at tutorials, but all the ones I found were for making sashing on all four sides of he block. I wanted to add sashing on only two sides. In the end, I found my own away to do it – the wider you cut the sashing and the more fabric you are prepared to ‘waste’, the better this works. Again, it didn’t occur to me to take photos of my work in progress – you can see how out of the habit of preparing for blog posts I have become!
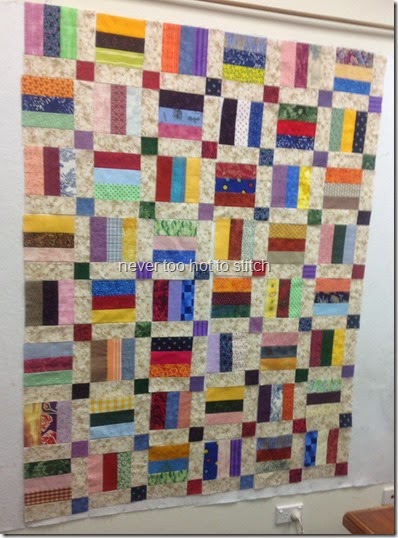
Armed with twenty blocks (I made the extra one), I headed to class at my LQS. They have a design wall – I do not! My teacher, who loves traditional patterns and Civil War fabrics, is quite bemused by me sometimes, I think! Here I was with a totally radical modern approach to quilt blocks and I hadn’t even consulted a pattern! I did take a photo of my layout on the design wall but have since deleted in from my iPad – because I’ve finished the quilt top. Here it is for your enjoyment:
I have also finished the backing.
The fabric used for the sashing and the backing is Saffron Craig’s Ginkgo Blossoms (c.2009). I used about three and half metres to make this quilt which will finish at 52” x 64” and is made up of twenty 12” blocks plus extra sashing down one side and across the bottom.
This one is basted and in the process of being quilted.
While I was on a roll, I made the backing for another quilt which I had finished in October last year.
It is made from ‘Disappearing Nine Patch’ blocks with one modification – I made the neutral pieces of the nine patch smaller than the coloured parts; thus giving a thinner sashing than would otherwise be seen.
Here is the finished backing, containing my signature panel. the blue sashing gives a completely different look to the neutrals on the front! I have laid the blocks differently too – to form a type of ladder. The backing fabric is a small yellow check, not the solid it appears in the larger photo.
My sewing time is taken up with quilting the Wonky Log Cabin quilt; then I’ll get to the Scrappy Disappearing Nine Patch.
In the meantime, my knitting time is spent trying to catch up with my mum who is powering ahead knitting blanket strips. Come back for my next post and see another of her knitted blankets that I have finished.
I'm linking this post with WiP Wednesday over at Freshly Pieced blog. Why not pop over and see what other crafters are up to?
May your stitches bring you much joy.
Lynne
Sunday, 19 July 2015
Violet & Friends and the Scrappy Churn Dash
Tuesday, 10 February 2015
it’s February and some people’s thoughts turn to hearts
I have to say, this soon-to-quilt-top is one of my favourite projects ever and I’ve blogged about it several times but it’s never had it’s own post.
In 2011, DD and I , with two month old Younger Grandson, made the hour and a half trek across Sydney for the inaugural meeting of what was to become the Sydney Modern Quilt Guild (now the Sydney Modern Quilt Group). We needed a hand-stitching project to keep us busy (well, DD had her hands full anyway) during the three hour meet-up. I had recently acquired an Accuquilt Go! Baby and had been keen to try it out.
I’m glad I learnt how to do fused appliqué in the few quilting classes I had taken at that point. I had also done embroidery in my past which, of course, included blanket stitch. Putting the two skills together, I was able to work on some of these:
Over the years, DD and I carried appliquéd hearts to meetings of the Caring Hearts Community Quilters and eventually I had thirty blocks done. But they were only 6” (yes, I was a new quilter and forgot to add seam allowance when cutting the squares) so I needed more blocks – or I needed to enlarge them somehow.
Inspiration came from two sources: a chance overhearing of a comment from someone in our quilting group on the merits of appliqué and/or scrap quilts; the other from the Dresden wedding quilt made by Jess at A Quilty Habit.
I enlarged my blocks and made them scrappy!
And I worked on the layout until I came up with this:
So, the obvious question is: if I love these blocks and this layout so much; why has the project stalled? Well, firstly, we moved house! That slowed all projects down for several months! But, more importantly, I know I need to add white sashing between the blocks but I'm not sure how I want to quilt it (using a walking foot; FMQ is out of the question for now). I think I want to echo quilt around the hearts but dragging the whole quilt though my domestic machine (even though I have a 9” harp space) doesn't inspire me so I’m considering QAYG row-by-row (gasp!)
What would you do if you were a novice quilter with little FMQ ability?
Sunday, 8 February 2015
slow stitching on the first finish of February
I'm also linking this post with Thank Goodness It's Finished Friday (I'm a little late) which is being co-hosted at Quokka Quilts and A Quarter Inch from the Edge (I've linked at the latter).

So, what do you think? Should I go back and add some vertical quilting? (I’m not taking the binding off!)
What would you do?
Tuesday, 27 January 2015
fourth fifth finish in ‘fifteen
Then there was the quilt donated by my quilting teacher. When donated, it was at the basted stage so the quilting and binding are my work ( although K. made the binding which was a time saver).
A couple of years ago, someone donated a pile of 9.5” QAYG string blocks. I made a quilt from some of them that was shown at the Airing of the Quilts in 2014.
While sorting through UFOs at the beginning of January, I found another 28 blocks. That wasn’t enough for another quilt so I made another 14 blocks – and in the process discovered that I don’t really like making QAYG string blocks!
How is your January progressing?


Wednesday, 14 January 2015
more works in progress
Before I continue, thank you to all the people who left comments in my Sunday post about binding quilt – it seems we all use more or less the same method!
My year will not continue in this vein. Right now, many Australians are on their summer break. Schools are having their summer holidays/vacation. Nearly everything I am involved with is in recess until later in January. That means I have plenty of time to play in my sewing room if I feel so inclined.
Since my post last Wednesday about works in progress, these are the projects that have had some attention:
THE FOUR PATCH QUILT
I only had to finish sewing down the binding on this quilt. However, I had a lot of trouble with the fourth corner, even more than usual, so I had to unpick the binding and carefully sew it back on again. The fourth corner is now the best corner of the lot! I referred to my issues with mitred corners in my post on Sunday; this is a skill I really want to master this year, sooner rather than later. Here’s a photo of the finished quilt (not my work remember; I only added the binding -- I wouldn’t mind laying claim to it though! It’s a great pattern beautifully constructed; if a little too large for me to hold up for the photograph!).
TRIANGLE BRIGHTS AND FLOWERS
The only task left on this quilt was to hand-stitch the binding down. I completed this by the bright, fluoresent light of my sewing room around one o’clock one morning! This is another beautiful quilt (not made by me) but, again, too big for me to hold the width while being photographed!
K’s PROJECT
This was the project I showed in my post on Sunday. I was quite surprise and pleased to find that I could quilt almost the whole block in one continuous line – joy! It may not look like it but, with the exception of the two grey lines which were quilted in a different colour, this was how it was done. Quilting gloves and the extension table for my sewing machine made the job easier too!
Despite my joy at completing this project, I’ve decided that quilting in the ditch and dragging a twin-size bed topper through my wide-necked machine are not my favourite parts of the process!
QAYG
Between bouts of quilting, to alleviate the stiffness in my shoulders and neck, I tried to work on the QAYG blocks. I found and cut some batting and backing. I learnt, very quickly, that pre-cutting QAYG backs the finished size is a recipe for disaster! Of course, this makes sense given that we always make our backing larger than our quilt top before quilting and trim away the excess afterwards! So, after carefully cutting several backings to 9.5”, it took only two strips to realise that wasn’t going to work. Fortunately, I have a lot of fabric so making new backings, 10.5” this time, wasn’t a problem. I will save the 9.5” squares (they’re all the same fabric) for another project.
I made a mess of the first block made on the 10.5” backing by not using strips that were long enough! We live and learn and now I know two ways not to do it! Plus I have one orphan block for another project! I watched several videos about QAYG (hurrah for YouTube) and thought I could see my way forward with this project.
Today, I am feeling unexpectedly lethargic (despite a full night’s sleep) so have been pottering on this project. Unfortunately, it means I’ve learnt yet another way not to make it work! The pre-existing blocks are made in a particular way, with a 9.5” front and back and a piece of 9” wadding centred between! I started with a 10.5” back and made all my strips the same (diagonal) length as the ever-shrinking back (it’s being quilted remember) but the wadding moved and ended up less than a quarter of an inch from the edge of the front and back in some places and nearly an inch away from the edge in others! I thought securing it with pins while I sewed on the strips was enough but apparently not enough to stop it from shifting! Thank goodness for seam rippers! Any hints you can give would be greatly appreciated since it’s another three weeks before I see my teacher again!
CRUMBED CHURN DASH
To complete each churn dash block, I need four ‘side’ units and four ‘corner’ units. I am making the corner units with HST (as expected) but I’m making the ‘side’ units from one strip and two squares – it’s a little bit different and helps remind me that these are scrappy blocks after all! I was very excited to see the first Churn Dash block come together – this is my first ever churn dash block and I’m very pleased!
So far, I have made two complete blocks and have eight extra ‘corner’ units completed.
Other than that, I have also cleaned my machine – I try to remember to do it regularly, especially after working with batting: that always seems to make additional lint!
I’m not sure that there will be a “works in progress” post next week – I will be away for three and a half days: tomorrow, WM and I are joining several other couples from church for a long weekend away at Sanctuary Point on the south coast.
I’m linking this post with WIP Wednesday over at Freshly Pieced blog (hosted by Lee) when it goes live later today.

What about you?
What have you been working on this week?
Wednesday, 7 January 2015
works in progress
- four patch quilt – to be bound and labelled
- triangle brights and flowers – to be bound and labelled
- pink brights and gingham – backing required
- K’s project – quilt, bind and label (binding supplied)
- QAYG string blocks – 14 more blocks needed