Showing posts with label UFOs. Show all posts

Friday, 8 January 2016

works in progress


The first week of January is almost done. It was as wonderful to have various family members visiting at Christmas and to visit other family members, but it seems a long time ago, despite being less than two weeks! Even New Year’s Eve seems longer than a week ago.

WM has returned to a normal work roster after a four-day weekend for Christmas and a three-day weekend for New Year. It’s summer here (although you’d never know it from the cool temperatures and rain we've had this week) so my quilting class is in recess until February. I've had lots of time in the sewing room and I've tried to make it profitable.

In the weeks leading up to Christmas, I spent many hours pressing, sorting, cutting and storing scraps. This is after a couple of days of that activity (the strips were cut specifically for the project mentioned further down this post):


Some of my tubs (shoe-box sized plastic containers) were getting very full; most notably the ones containing 2 1/2" squares, 3" squares and strings/strips of all sizes.


Before Christmas I began a “leader/ender” project that took over my sewing time. The project I had planned required me to make lots of HST units measuring 2.5”. That took care of the 3” squares – I still haven’t made enough and I'm running out of squares! So far I've made 320 units (I need 400) and trimmed 104 of them! They call to me constantly from the edge of my cutting table where I have them stacked in groups of twenty for ease of counting. Here are 200 stitched HSTs waiting to be trimmed!


The unused squares call to me every time I sit down at my sewing machine – they are right beside hard-working Jan waiting for the next time a leader’'/ender is needed.


In November, DD and the Grandboys came for a visit. They wanted to sew and decided on ‘spider webs’ so we began making monochrome 60° triangles from strings which we had first sewn into 8.5” squares. They, of course, did very little sewing and little progress was made. After they left, I cut up 144 x 9” strips (of various widths) in five colours –yellow, green, purple, blue and red. I wanted to see how it would work out and sewed all the yellow strips into blocks then cut the triangles. It didn't take me long to realise that we were, in fact, not making spiders webs but giant hexagons!

I looked at pictures on the internet and discovered that spider’s webs were made up of eight triangular units, not six; and that they were generally not made in monochrome fashion!

So, when DD and the family were again for Christmas, we made the decision to use the triangular shaped wedges in a different way; inspired by this pattern in the book Scrap Republic (by Emily Cier). Emily’s pattern is called “Slices”.

We are not yet sure how we will put the units together – that is still quite a way off. We have made all the yellow, green and purple triangles, leaving some of the red and blue ones (their favourite colours) for the boys’ next visit (probably April). Here is the stack of “wedges” we had prepared by the end of December.


The good thing is, because we made squares first them cut the 60° triangles, I have lots of ‘wedges’ left over – there will be almost enough for another small quilt!


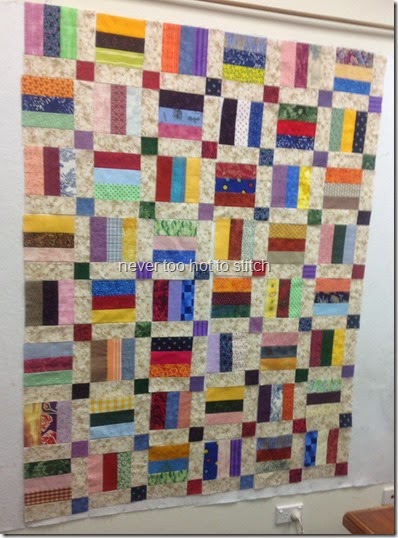
Despite being ‘surrounded’ by these two works in progress, on Monday, my first day of sewing without any need to go anywhere or do something else, I returned to an almost forgotten UFO. I started Green Strips and Triangles in July 2014 but abandoned it as being too much trouble. I distinctly remember I couldn't work out how to make sure the strips were long enough to make the 10.5” (unfinished) squares I required. I didn't want to make the blocks QAYG but somehow, the strips never seemed to work! Time, of course, gives a fresh perspective. I realised in the wee hours of Monday morning that I could use foundation piecing to make the blocks and, if I used a wide strip on the centre diagonal, I could make an 11” square (I actually made them 11.25” to give myself a little leeway), I could then cut the white fabric into squares, sew 1/4” from the central diagonal then cut it into two pre-made squares! Why did I not think of that back in 2014? (Although I had made QAYG blocks on wadding/batting, I hadn't ever done foundation piecing on paper back then but now, having learned the technique, it made perfectly good sense!)

Alas, all that preparing foundations then tearing them away afterwards became such a time drain – I decided there had to be a better way. Eventually, I marked out a ‘template’ on my cutting mat and used that. It worked pretty well; not as well as the paper foundations I admit but I got the job done more quickly!


In 2014 I had made four blocks, two of them  wrongly! In three days this week, I made the other twenty-eight blocks I needed! Here are three of them in the setting I plan to use.

As I sewed and pressed and cut and sewed some more, I thought about how I will quilt it... The strips are easy; I'm pretty sure that will be straight line quilting, running parallel to the strips themselves. But what of that self-striped triangle -- what should I do there? I am not competent at FMQ and this is a donation quilt. On the other hand, it might be time to start practising!

What do you think?

I'm linking this post with WiP Wednesday over at Freshly Pieced.

Thursday, 23 July 2015

there is work in progress

At Easter, DD and the family came to visit – it was so good to be able to spend time with them again; especially since DD and I got to spend some time together in the sewing room. Older Grandson helped to sort scraps and it wasn't long until he wanted to sew too. He loved sitting on my lap and feeding fabric in to the machine that was running on the slowest speed possible. At the end of the weekend, we had nineteen scrappy quarter-log cabin blocks of varying sizes made (they weren’t square and ranged in size from 9” to 11.5”). Unfortunately, I didn’t thing to take photos of the blocks that we made but I do have some photos of Older Grandson hard at work!
 2015-04-03 Ben sews on machine 2 2015-04-03 Ben sews on the machine 2015-04-03 Ben irons

In May, it was announced at our quilting group that there was going to be a log cabin challenge for all of us to use up scraps! Seems like I was already ahead of the game! LOL

I searched the internet for inspiration – I had absolutely no idea how to put those blocks together given their different sizes and shapes. But sometimes, I just have to be patient and let ideas percolate. In the end I decided to go with a wonky setting but I still had no idea how to go about it. I started looking at tutorials, but all the ones I found were for making sashing on all four sides of he block. I wanted to add sashing on only two sides. In the end, I found my own away to do it – the wider you cut the sashing and the more fabric you are prepared to ‘waste’, the better this works. Again, it didn’t occur to me to take photos of my work in progress – you can see how out of the habit of preparing for blog posts I have become!

Armed with twenty blocks (I made the extra one), I headed to class at my LQS. They have a design wall – I do not! My teacher, who loves traditional patterns and Civil War fabrics, is quite bemused by me sometimes, I think! Here I was with a totally radical modern approach to quilt blocks and I hadn’t even consulted a pattern! I did take a photo of my layout on the design wall but have since deleted in from my iPad – because I’ve finished the quilt top. Here it is for your enjoyment:
 finished front

I have also finished the backing.
finished back

The fabric used for the sashing and the backing is Saffron Craig’s Ginkgo Blossoms (c.2009). I used about three and half metres to make this quilt which will finish at 52” x 64” and is made up of twenty 12” blocks plus extra sashing down one side and across the bottom.
This one is basted and in the process of being quilted.

While I was on a roll, I made the backing for another quilt which I had finished in October last year.
on design wall

It is made from ‘Disappearing Nine Patch’ blocks with one modification – I made the neutral pieces of the nine patch smaller than the coloured parts; thus giving a thinner sashing than would otherwise be seen.
ready to cut and disappear

Here is the finished backing, containing my signature panel. the blue sashing gives a completely different look to the neutrals on the front! I have laid the blocks differently too – to form a type of ladder. The backing fabric is a small yellow check, not the solid it appears in the larger photo.
 finished back backing fabric
My sewing time is taken up with quilting the Wonky Log Cabin quilt; then I’ll get to the Scrappy Disappearing Nine Patch.

In the meantime, my knitting time is spent trying to catch up with my mum who is powering ahead knitting blanket strips. Come back for my next post and see another of her knitted blankets that I have finished.

I'm linking this post with WiP Wednesday over at Freshly Pieced blog. Why not pop over and see what other crafters are up to?

May your stitches bring you much joy.
Lynne

Saturday, 2 August 2014

Something Old, something New – August edition

Never too hot to Stitch!
Finally, more than halfway through the year,  I am able to report that I had a pretty good month in achieving some of my plans.

My list for July was long compared to other months – perhaps that’s what spurred me on!
Actually, I think it was having all my fabric and yarn sorted and in the right places that made it easier for me to be productive.

So, let’s look at my focus list for July.
  1. The first of my “Something Old” projects was to repair the toe on one sock of the first pair of hand-knitted socks I made for WM. Back then, I didn’t know how to graft properly and dropped a stitch. That toe has been unpicked, ripped back to the dropped stitch, re-knitted, re-grafted and blocked and looks good. Mind you, he hasn’t worn it yet, so I don’t know how much the re-knit stitches will stretch! From my point of view, goal accomplished!
    2007 Heirloom sox 1st
  2. My second “Something Old” project was a pair of socks I knitted, frogged and re-knitted. They have been hibernating for (literally) years because I thought the legs were too short and I couldn't face ripping back past the heel again. I think I’ve gotten more ruthless since all that de-cluttering before we moved; I made a decision to just get them finished and stop agonising! Goal accomplished!
    2010 Tidal Wave socks too short
    Note to self: don’t use a variegated yarn for a subtly patterned item!
  3. The smallest of my “Something Old” projects was to knit one man-size fingerless mitt to match the one I finished two years ago (I may not have ‘second sock syndrome’ but mittens are a different matter, it seems!) I did not even cast on for this one; I got too excited about other knitting projects (subjects of another post).
    man's mitt
  4. My biggest “Something Old” project was my Country Houses quilt. This has been in hibernation since I decided it was too big for a single (twin) bed but too small for a queen/double (full). I didn’t have enough of my original dark green fabric to add more to the quilt so it went into hibernation. For a long time I couldn't decide what to do with it, then I couldn’t find any fabric that I liked. Finally I settled for a very subtle beige on white stripe. I thought I would add some of the checked fabric I had used in the houses as a border for the central part of the quilt (thus making it wide enough to fit a full-size mattress) then add the striped fabric to hang over the bed. I would stitch houses onto the fabric to tie in with the central panel. It all seemed good in theory but it didn't work! Even from a distance of only a couple of metres, the fabric read as white and the beige colour I had chosen for the stitching disappeared into the fabric.
    side panel not working side panel house too subtle
    I really, really didn’t like it! I tried to convince myself that six hours of work had been done and it would be okay but I knew it wouldn't and there was nothing for it but to rip out all that stitching – slowly and carefully as the fabric seemed a lot more delicate than it should! However, I had to use that fabric, I had bought four metres of it (What was I thinking?) and fabric in Australia is around $25 a metre (40”) so I knew I couldn't waste it. It It is still waiting for the day I can face ripping out all that work! In the meantime I realised that I would have to cut the ‘white’ fabric into smaller blocks and that I would have to appliqué houses to them. I considered hand embroidery but the appliqué would have more substance, hide quite a bit of that white and probably be faster! All that to say that the Country Houses quilt is still a work in progress and will, hopefully, be completed in August.
  5. My “Something New” project was a blue Bargello table runner that I only work on in class. That meant only two lessons during July so the fabric was selected, pressed, cut, seamed, pressed and made into two tubes ready for the next cutting step. I only planned to get started on this technique, so goal accomplished!
  6. I listed my Keyboard Scarf, which is knitted in a shadow (illusion) technique, as a “Something New” project even though the technique itself was not entirely new and I had started (and frogged and restarted) the scarf in June. Following a chart for the technique was new so it was, sort of, a “Something New” technique. The scarf was not finished in time for the workshop I tutored but it was long enough to take as a sample. It was finished last week. Goal accomplished!
    2014 Keyboard Scarf stripes only
    What do you mean you can only see stripes? LOL
    That’s why it’s called an illusion! Does this help?
    2014 Keyboard Scarf illusion 
  7. The biggest goal on my focus list was to sort and store my yarn stash. I wrote a post about that here so I won’t go into more detail except to say: goal accomplished!
  8. Then came a WIP – Socks for Someone #4: they were finished on the first of the month.
    Goal accomplished! 2014 Socks for Someone #4
  9. Socks for Someone #5 were cast on immediately. I like to always have a pair of socks on the needles, they make great travelling knitting and I have lots of sock yarn! The first sock was finished and the second cast on before the end of the month. This was another project I only planned to start, not finish so goal accomplished!
    2014 Socks for Someone #5 first sock done
  10. Another WiP was my Nouveau Log Cabin blanket which I finished knitting in June but the ends still needed to be sewn in before I could say “Goal accomplished! That happened on the evening of the 30 July and I’m glad to see it done!
    2014 Nouveau Blanket
As you can see, a pretty good month. There were other sewing projects started which I mentioned in this post and other knitting projects completed (but you’ll have to wait until next week’s post to see those).
Yes-sirree, I’m a pretty happy stitcher this month!
Now can I carry the momentum forward?
What about my plans for August?
  1. Something Old: I’m embarrassed to type this: I’m going to finish the curtains I started in 2011! I think the fabric print is too young for the boys now but DD wants them so wish me luck!
  2. Something Old: man’s fingerless mitt (see item #3 above)
  3. Something New: I’m going to learn how to make a quillo, then I’m going to make a second one – I have two grandsons so one is not enough. Because this is my “Something New” project, they don't have to be completed, just one has to be started and some progress made.
  4. WiP: finish the Bargello table runner.
  5. WiP: finish the Country Houses quilt   **sigh**
  6. WiP: finish the Green Scrappy Strippy quilt top started last week.
    eleven rows done, 21 to go
  7. Grab Bag Challenge: Taupe Buffalo Shawelette – I knitted six repeats of the pattern in two days; it’s a very easily memorised pattern. I am trying to decide if I have enough yarn to knit a seventh pattern repeat. I plan to finish this one.
  8. WiP: finish piecing my curved blocks (20 to go)
  9. WiP: Green Stripes and Triangles – make at least two blocks to add to this one (I need 35 altogether)
    OLYMPUS DIGITAL CAMERA
     
There’s a lot of sewing projects in there, seven out of nine items; as opposed to last month when it was seven knitted projects, one sorting project and two sewing projects! It will be interesting to see how much I actually get done – I’m pretty sure this list is Way. Too. Ambitious.

What about you?
Did you achieve your goals for July?
What do you have planned for August?
Link here with the URL of your blog post so we can visit and see what you’re up to. Thanks.

Thursday, 2 January 2014

Something Old, Something New -- January edition

Never too hot to Stitch!

Hello and welcome to the first post of this Linky party. If you are here for the first time and have no idea what "Something Old, Something New" is about, you can read the guidelines by clicking on the tab at the top of this blog. That's where you’ll find the “grab code” or you can get it from my sidebar. Some further background reading is in this post where I first proposed the idea.

Basically, "Something Old, Something New" (SOSN) is about two things each month:
  1. Choosing one UFO to work on* -- for me a UFO is any project I haven't touched in the last three months; but you may have a different definition and that's okay!
  2. Choosing one new technique to learn or practice
*Originally I said to "finish" a UFO but there are some projects that can't be finished in a month but can be worked on! For example, I have a cross stitch that was started many years ago and is nearing completion but there's no way I can finish it in a month and still have a life! So I'm changing the {rules}  from "finish" to "work on"!

Personally, I am intending to focus on both the "old" and the "new" each month but you might choose to work on only one or the other, it's totally up to you!

On the second day of each month, I'll put up a Linky party where we'll share how we went with our previous month's goals and list the goals for the following month.

I don't know about you but I have so many UFOs and so many techniques I'd like to learn that it's hard to choose one!

So, what do I plan for January?

Old -- Rainbow Blocks quilt
I made the blocks in 2011-2012 as part of the Rainbow Scrap Challenge, and it's time to do something useful with them! I'm not sure I will get it finished but my aim is for a completed flimsy!
2011 purple improv  2011 yellow improv 2012 green improv blocks 2012 orange improv2011 red improv 2012 pink improv 1 2012 pink improv 2 2012 purple improv 2012 teal improv 2012 yellow improv

New -- Shadow (Illusion) knitting
I am booked to tutor a workshop in this technique in July and I haven't tried it myself; so if I start now (and continue to practise) I will have some level of experience by July! I can’t show you a photo because I haven’t started yet but here is a link to a great design on Ravelry.

How about you?
Are you going to drag an old project out of its hiding place and work on it?
Or are you going to start the new year by learning a new technique?
Maybe both?

Please link up here with the URL of your blog post so we can all visit and cheer you on.

If you don't have a blog, leave a comment with the address of where we can find your photos (eg Flickr).

Have fun working on your projects in January!

2013: the Year of the Finished Project

Well, here we are -- the last post of this challenge.

For some of you, this has been a great year in terms of getting UFOs completed. For me, the year wasn't as productive as I would have liked.

However, I have met some new blog friends and completed some UFOs/WiPs. People have been very encouraging and that's always a good thing, right?

My December goals looked like this:
  1. Notebook Covers for sewing classmates
  2. Scrappy Diagonals quilt
  3. Knitted Patchwork #2 blanket
  4. Hearts quilt
  5. Westall Cardigan
So how did I do?

The Notebook Covers (link to tutorial) didn't happen. Honestly, I couldn't imagine anyone getting excited about them as a gift, I fussed about what fabric to use for each person and, in the end, decided to just buy them something. This is the first time I've done that since I started in the class -- in 2011 I made wheat bags and in 2012 I made apricot slice. To save myself angst, I have already put "start Christmas gifts for classmates" in my calendar for late June! I don't want to be caught out again buying gifts from the store at the last minute!

I have not touched the Westall Cardigan at all. I am still not convinced that the pattern works in the yarn I have chosen. On Tuesday morning it occurred to me to knit a swatch of the lace pattern to see how it blocks out -- doh! You'd think as a knitting tutor, making a swatch and blocking it would be "normal" for me but its not, I still don't think about it until something like this happens! The photo shows the cardigan with no sleeves; I have done one sleeve but am not happy with my short row shaping! This yarn has great stitch definition – just what I don’t need!
2013-05 westall cardigan body complete
Nearly all of my knitting in December was related to finishing Knitted Patchwork II. This was completed on 17 December. Older Grandson seemed to take a liking to it but didn't miss it when I put it away so it has gone into the pile of completed blankets to be stored for when they're needed.
Knitted Patchwork II  
I finished the Diagonal Strings quilt on 13 December. It was good to get it done. I'm not sure I like that method of QAYG -- I have a great deal of trouble pin-stitching the sashing in place! I guess only further practice will improve that!
Diagonal Strings finished
The Hearts quilt finally got its day in the sun on 31 December, not that I did much! I started writing a long description about it but decided to save that for my "thank goodness it's finished" post (hopefully sometime in January).  I was going to say it would be my UFO for January but it can't be -- it's a WiP because I've worked on it in the last three months! Sorry about the angle of the photo – this is the only way I can see all of what's on my design wall; my cutting table, which can’t be moved (seen in bottom right of photo), gets in the way.
blocks done and final layout
It is this project that I am linking up with A Lovely Year of Finishes over at Fiber at All Sorts blog. After debating with myself over the best way to finish it, I have finally decided to QAYG row by row!
A Lovely Year of Finishes


Well, folks, that's it. The Year of the Finished Project is over. Thank you for being a part of this and playing along with me. I invite you to join my "Something Old, Something New" (SOSN) challenge which starts today (the Linky party is on the second day of each month). The first post for SOSN will be published later today (Australian Eastern Summer Time).

How about you? How did you go with your goals for getting projects finished in December?
Please link the URL of your blogpost here so we can all visit and see what you've been doing.
Thanks once again for joining in -- see you over at SOSN!


Monday, 30 December 2013

Something Old, Something New -- part II (with button and grab code)

Note: This post is almost identical to the information in the tab at the top of this blog so you may have already read it. Please leave a comment if you're thinking of joining the party! ;-)
~~~~~~~~~~~~~~~

Nearly all the crafts-people I know are like me. We all have UFOs that we "should" be working on but the lure of the new beckons us.

In 2014, I want to concentrate on learning new techniques across many of the crafts in which I am involved. However I also want to get some of those UFOs out of my craft room and into use.

Hence: Something Old, Something New. I am challenging myself to finish (at least) one UFO a month and, at the same time, learn (at least) one new technique a month.

How do I define UFO? Any project I haven't worked on in the last three months is a UFO. If I've done some work on it in the last ninety days, it's a WiP and doesn't really qualify! But that's the boundaries I've set myself. You can set any boundaries/rules/guidelines -- whatever works for you!

Maybe you are unlike me and have no UFOs but would like to learn some new techniques.
Or maybe you've dozens of UFOs and no plan (right now) to learn new techniques -- you just want to get those UFOs done!

You've come to the right place.
For me it will be "old" and "new" but for you it might be either "old" or "new".

Won't you please consider joining me for this year's challenge?   
Any craft, any project, any technique is welcome.

I'll put up a linky party on the second day of each month (there are many other linky parties happening on the first of the month! LOL). In that post, I will share my progress from the previous month and list my goals for the month to come.

There will be no prizes, no give-aways; just the joy of sharing and perhaps meeting some new blog friends. 

I'd love you to join me -- parties are much more fun when other people come along! Here's the button for your blog if you accept my invitation!
Never too hot to Stitch!