Thanks for all the support and helpful tips in the comments section of my last post. I thought I would update you on our "progress"!

We will be getting a new copy of the DVD to watch but in the meantime we took the DVD and a laptop to the garage so that we could set up the quilting frame correctly. The DVD and the laptop did not want to play nicely, so we ended up just doing it as we remembered (and as seemed logical to us)!
The quilting frame remains the same length. WM was very tired (and cross) yesterday so, rather than take it apart and put it back together again, he came up with this solution! It works!
We will be getting a new copy of the DVD to watch but in the meantime we took the DVD and a laptop to the garage so that we could set up the quilting frame correctly. The DVD and the laptop did not want to play nicely, so we ended up just doing it as we remembered (and as seemed logical to us)!
We only used two layers of calico fabric (I think it's called "muslin" in USA) with no batting. Batting is very expensive so, until we get a feel for the machine, we'll just practice without it! When we have an idea of what we're doing, we'll sew together some batting scraps and practice with that. Then it will be time for the real thing!
The quilting frame was built for a Husqvarna Mega Quilter but I bought a Brother 1500 as part of the package. Here are the controls on the quilting frame: the knob regulates the speed. You can see the cable coming out of the control handle.  This is the three-pin plug that goes directly from the controls into the Mega Quilter.

Since this doesn't fit into the Brother we have to use the foot pedal which is a bit more clumsy.
We have managed to break one needle so far and have had threads tangle in the bobbin case which meant we had to remove the machine from the quilting frame, carry it inside (from the garage) to a suitable workspace, and take off the the needle plate. We managed to removed the offending thread and gave the machine a much needed and thorough cleaning while we were at it.
The needle threader is broken on the Brother so we have to thread the old fashioned way which would be okay if the thread (Gutermann) didn't keep snapping all the time!
So, after several hours we managed to "quilt" two layers of calico 36" x 6"! Not much to show for the hours we had spent! This photo is DD's very first play! She wouldn't let me show her anything - she just wanted to "have a go!"
This next photo shows my quilting as I came back between the shapes DD had made. On the left you can see where we stopped because the thread had broken yet again!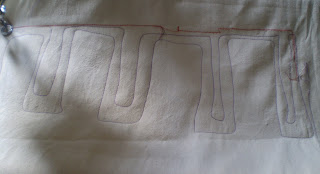
Are we having fun? Not yet!
Are we learning many things? Yes, patience among them!
This is the three-pin plug that goes directly from the controls into the Mega Quilter.Since this doesn't fit into the Brother we have to use the foot pedal which is a bit more clumsy.
We have managed to break one needle so far and have had threads tangle in the bobbin case which meant we had to remove the machine from the quilting frame, carry it inside (from the garage) to a suitable workspace, and take off the the needle plate. We managed to removed the offending thread and gave the machine a much needed and thorough cleaning while we were at it.
The needle threader is broken on the Brother so we have to thread the old fashioned way which would be okay if the thread (Gutermann) didn't keep snapping all the time!
So, after several hours we managed to "quilt" two layers of calico 36" x 6"! Not much to show for the hours we had spent! This photo is DD's very first play! She wouldn't let me show her anything - she just wanted to "have a go!"
This next photo shows my quilting as I came back between the shapes DD had made. On the left you can see where we stopped because the thread had broken yet again!
Are we having fun? Not yet!
Are we learning many things? Yes, patience among them!
Progress! When I have troubles with thread breaking something is usually threaded wrong. My machine uses needles that have a long slit down the front. If the slit if off of center it stresses out the thread. Having the machine's tension too tight can do it too.
ReplyDeleteI don't think that batting is necessary. It will change the way your stitches look, but not everyone likes it. I had a customer who insisted on putting flannel in her quilts instead of batting.
How do the prices for polar fleece compair to those for batting? I know that it wouldn't crinkle the way cotton batt does when it is washed, but it would provide the same sort of loft for your quilting practice.
Wow! Seems like I have missed some drama :)
ReplyDeleteI can only encourage. I have no idea how to help. It reminds me of the knitting machine I had as a young woman.
Keep trying. It has got to be the best way to overall quilt.
You're on the right track - keep your optimism and spirit and give it another try when you're feeling better.
ReplyDeleteIt looks to me like the back roller with fabric the one that goes in the throat of the machine, is rolled the wrong way-the fabric should be under the roller there to keep the fabric flat against the bed of the machine-that would cause the thread to break often as would tension too tight. (I see you are talking about an adapter which is different than my set up-you are right-frustrating-hit up ebay again for another one)
ReplyDeleteUgh! I see frustration is still a factor.
ReplyDeleteI've definitely missed something! I'll have to go back and read some past posts. Looks like you have a fun (or maybe not so fun) machine to play with. Cool!
ReplyDeleteSounds like some progress at any rate. Hope you can get all the issues worked out soon.
ReplyDeleteI think I agree with Delighted Hands that the back roller might be rolled the wrong way. On my machine the fabric goes up from under and then rolls counterclockwise. There is also an additional poll that it tucks under to hold the fabric down and flat. Yours looks like it angles up which would make it hard to keep the tension even. Keep at it, I'm sure it will get easier.
ReplyDelete